Showing posts with label XDT. Show all posts

Friday, June 18, 2010

Parameterization vs. Web.Config Transformation

I was recently asked about being able to change values of different variables like ConnectionStrings, Installation physical directory, app Settings etc during install time rather than build time, so I thought it might be worth while to de-mystify the concepts around Web.Config Transforms and Parameterization…

Web.Config Transformation

Geeks say Web.Config Transformation is a great feature of Web Deploy (aka MsDeploy), well the first part about being a great feature is true :-) but it is important to note that Web.Config Transformation is not a Web Deploy feature but it instead is a VS 2010 only feature.  Web.Config Transformation is connected with Build configuration of MSBuild/VS/Team Build etc…  Its XML transformation engine is wrapped in MSBuild and has a UI around in VS 2010 which yeilds following benefits:

If you are building a deployment web package (.zip) and know which environment you are building for then web.config transformation is great.  This is the category where many of us fall coz we build for a release environment and need the right config file to go in that deployment package.  For that matter many people are just fine creating web packages for the correct environment they are deploying to…

Now for others who want to be able to build just once and deploy to both test as well as staging/release environment then an embedded web.config file for one environment may not work.  For this scenario there is parameterization.

Parameterization

Parameterization, unlike Web.Config Transform is Web Deploy (aka MsDeploy) only feature, which means that it will not work in non-Web projects or when you are using other protocols like FTP/FTPS etc.  Parameterization from Web Deploy standpoint is a 2 step process

  1. Declare Parameters: You create a Parameters.xml file and pass it to Web Deploy while creating the package…  In this file you need to indicate what file you want to parameterize  (e.g. web.config), what variable inside the file needs to be parameterized (e.g. connectionString) and what would be the default value of the variable (e.g. release connectionString)… Using Parameters.xml file, Web Deploy will create an internal meta data file within your .zip package which guides Web Deploy to know what “Questions” to ask the person who is installing the .zip package… 
  2. Set Parameters: When user is about to install the web package the value of the Parameters can be provided to Web Deploy via several means.  In case you are using IIS Manager to install the package then the IIS Manager UI will automatically show the Parameters with filled in default values.  If you are using Web Deploy command line to install the package then you can provide a setParameters.xml file to the commandline (in case of VS 2010 generated deploy.cmd file just having setParameters.xml file in same folder as the .cmd and .zip file is sufficient).  The setParameters.xml file is a very simple name-value pair file in which you can provide the value of the parameter adjacent to its name.

In one of the future posts I will write more about how to use Parameterization for some canonical deployment scenarios, but hopefully this will lay the foundation of how to differentiate between build time transforms from install time parameters.

Conclusion

If you can know your environment settings during build time use Web.Config transformation. 

If you would want to create deployment package only once and then enter the settings during install time then use Parameters.xml

VS 2010 actually uses a combination of Parameters and Web.Config transforms to provide you with a seamless experience (i.e. connectionStrings, IIS Application Name etc are already parameterized by default) so for most common scenarios you would hopefully not have to delve into understanding all the details but if you have any questions then of course feel free to ask here or via email…

Thanks

Vishal

Tuesday, May 18, 2010

Applying XDT magic to App.Config

For several weeks now people have been asking to be able to use the XML Document Transform (XDT) with App.Config files similar to what is available with Web.Config files in VS 2010…
In all honesty there is no official/supported  implementation of XDT for any other project type than Web Application Projects but the good news is that the basis of Web.Config Transformation resides in Web Publishing Pipeline (WPP) which are set of extensible tasks and targets hooked up to provide a great deployment story for Web Applications…
Today, Ming (our senior dev on Visual Studio) and I decided to get together to give some love to App.Config file too… The below implementation is a crude way of getting XDT working into other project types within VS 2010… In a way, I would say it is a big solution for a smaller problem but the idea here is to get people unblocked and show the kind of things that WPP is capable of doing… 
If by now everything is sounding foreign then please check out the articles:

  • Web.Config Transformation
  • VS 2010 Snippets for Web.Config Transformations
  • Web.Config Transforms (XDTs) for any XML files in your web projects
    Goals
    • Being able to use XDT syntax for App.Config files similar to what you can use with Web.Debug.Config and Web.Release.Config…
    • Being able to use this in an automated fashion in build environments like Team Build…
    • Reduce the concept count and make it as simple as possible (without digging deep into optimization & performance)…
  • Please take a look at Visual Studio extension which allows you to do this without the manual workarounds below:
  •  http://visualstudiogallery.msdn.microsoft.com/69023d00-a4f9-4a34-a6cd-7e854ba318b5

    Step by Step Instructions

    The example I am using below should be hopefully super simple that you can follow along without any prep work… All you need is VS 2010 which has “Visual Web Developer” components installed…

    Step 1 Create a new Windows Forms Application in VS 2010

    Step 2 Add App.Config file to the project…

    Add simple test settings to App.Config file as shown below:

    <?xml version="1.0" encoding="utf-8" ?>
    <configuration>
      <appSettings>
        <add key="author" value="Vishal Joshi"/>    
      </appSettings>
    </configuration>


    Step 3 Add App.Debug.Config file to the project, I would recommend using the same App.Config file adding mechanism as shown below


    app.debug.config


    Step 4 Modify the content of App.Debug.Config as shown below:


    <?xml version="1.0"?>
    
    <!-- For more information on using App.config transformation visit http://go.microsoft.com/fwlink/?LinkId=125889 -->
    
    <configuration xmlns:xdt="http://schemas.microsoft.com/XML-Document-Transform">
      <appSettings>
        <add key="article" value="XDT Magic for App.Config Files" xdt:Transform="Insert"/>
      </appSettings>
    </configuration>


    The key things to note above are:


    • There is a XDT namespace declaration which allows XDT engine to recognize the Transform/Locator syntax in the file


    • There is a new node being inserted into the config file using the syntax xdt:Transform=”Insert”


    Step 5 Save the edited files and unload the project frin VS 2010 Solution Explorer using the right click command as shown below:
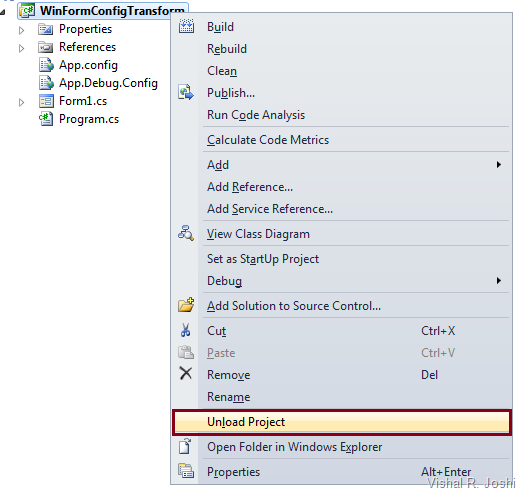


    unload project


    Step 6 Edit the .csproj/.vbproj file to make App.Debug.Config file to be dependent on App.Config file as shown in the syntax below:


        <Content Include="App.config" />
        <Content Include="App.Debug.Config" >
          <DependentUpon>App.Config</DependentUpon>
        </Content>


    The key things to note above are:


    • By default the build action of App.Config and App.Debug.Config file will be “ None”… It needs to be changed to “Content”… This is a tiny pre-requisite for WPP but if you encounter any issues because of this then we can dig the work around…


    • DependentUpon node will make your App.Debug.Config appear as a node under your App.Config file similar to the way Web.Debug.Config and Web.Release.Config files appear under Web.Config file…


    • In VB Projects nested files are hidden so you might need to unhide these by clicking the icon on the solution explorer…


    Step 7 Change the ProjectConfigFileName property within your .csproj/.vbproj file


    WPP has an inbuilt property called ProjectConfigFileName which is by default set to Web.Config, we need to change this to app.Config which will allow projects like WinForm project not expect web.config files to transform… You can add this property right under ProjectGuid property as shown below:


      <PropertyGroup>
        <Configuration Condition=" '$(Configuration)' == '' ">Debug</Configuration>
        <Platform Condition=" '$(Platform)' == '' ">x86</Platform>
        <ProductVersion>8.0.30703</ProductVersion>
        <SchemaVersion>2.0</SchemaVersion>
        <ProjectGuid>{2D587604-866B-4675-8587-FA9728EC59D8}</ProjectGuid>
        <ProjectConfigFileName>App.Config</ProjectConfigFileName>


    Step 8 Hook up WPP within your WinForms project by importing the WPP targets.


    You can search for “Import” node in your project file and then simply copy below one line for WPP targets import


      <Import Project="$(MSBuildExtensionsPath)\Microsoft\VisualStudio\v10.0\Web\Microsoft.Web.Publishing.targets" />


    Step 9 Add a target to copy the transformed App.Config file to your output (BIN) directory


    You can simply copy paste the below code just before your </project> node closes in the .csproj/.vbproj file


      <Target Name="PostTransformAppConfig" AfterTargets="TransformWebConfig">
        <Copy Condition="Exists('$(TransformWebConfigIntermediateLocation)\transformed\App.config')" 
              SourceFiles="$(TransformWebConfigIntermediateLocation)\transformed\App.config" 
              DestinationFiles="$(OutputPath)\WinFormConfigTransform.exe.config" />
        <Copy Condition="Exists('$(TransformWebConfigIntermediateLocation)\transformed\App.config')" 
              SourceFiles="$(TransformWebConfigIntermediateLocation)\transformed\App.config" 
              DestinationFiles="$(OutputPath)\WinFormConfigTransform.vshost.exe.config" />
      </Target>


    The key things to note above are:


    • We hooked up the new PostTransformAppConfig target after TransformWebConfig target… The TransformWebConfig target is the native target in WPP which does any XML transform and will do the actual job of transforming App.Config as well..


    • The location at which the new App.Config file is getting copied is pretty self explanatory but do note that you do want to change “WinFormConfigTransform” to be the name of your own Project…  I just used a project called “WinFormConfigTransform” and hence the DestinationFiles path is named as such…


    Step 10 Run /T:TransformWebConfig task on your Project from MSBuild


    You need to use Visual Studio 2010 Command prompt and type in the below command


    msbuild C:\Vishal\WinFormConfigTransform.csproj /t:TransformWebConfig


    After running the above command if you now check the BIN folder of your project you should see that the Project.exe.Config file is now modified as shown below:
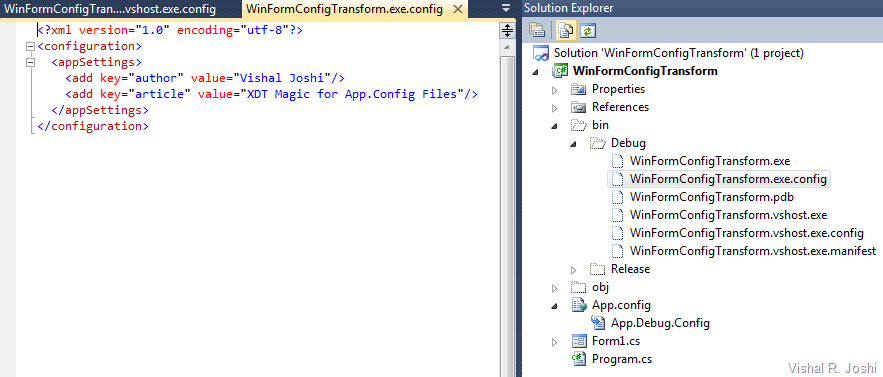


    image 


    NOTE: If you want the App.Config file to be Transformed after every build in your Visual Studio IDE (this will take some perf away but may not even be noticeable) then you can change Step 9 code to be as below:


    <Target Name="PostTransformAppConfig" AfterTargets="Build">
        <CallTarget Targets="TransformWebConfig"/>
        <Copy Condition="Exists('$(TransformWebConfigIntermediateLocation)\transformed\App.config')" 
              SourceFiles="$(TransformWebConfigIntermediateLocation)\transformed\App.config" 
              DestinationFiles="$(OutputPath)\WinFormConfigTransform.exe.config" />
        <Copy Condition="Exists('$(TransformWebConfigIntermediateLocation)\transformed\App.config')" 
              SourceFiles="$(TransformWebConfigIntermediateLocation)\transformed\App.config" 
              DestinationFiles="$(OutputPath)\WinFormConfigTransform.vshost.exe.config" />
      </Target>


    The only key difference above is that I made the new target to be called after “Build” and in the new target I made a call to “TransformWebConfig” target to ensure the transform happens before we try to copy the transformed app.config file to their final location…


    With the above change now when you build in IDE then the new transformed App.Config will be copied to your output directory…


    With the above 10 steps you should now be able to Transform your App.config just like the way you do Web.Config files in VS 2010


    -Vishal


    PS:  Whenever you make changes to your project file (like above) you make your project susceptible to data loss during upgrade to future versions of VS as next versions of VS will not know all the fancy code you put in the files, but such risks are part of the game to get all the fancy toys working :-)

    Sunday, May 02, 2010

    Xml Document Transforms (XDT) for any XML file in your project

    There have been several requests floating around to be able to use XDTs (the technology behind Web.Debug.Config/Web.Release.Config) with other XML files within the project…  To make that feasible I wrote a XmlDocumentTransform.targets  file which can generically transform any XML file using the standard Web.Config Transformation syntax introduced with VS 2010…

    Learn more about XDT & Web.Config Transformation here…

    Now to get started first download XmlDocumentTransform.targets file from my Skydive…

    Follow the below simple steps to get transformation working for any well formed XML file in your project…

    • Step 1: Save the downloaded XmlDocumentTransform.targets to %ProgramFiles%\MSBuild\Microsoft\VisualStudio\v10.0\Web\XmlDocumentTransform.targets

    image

    NOTE: I would highly encourage you to make a copy of the Microsoft.WebApplication.targets file as backup before you do Step 2 below, as if this file is modified incorrectly then your VS 2010 instances might start showing funny problems which will be virtually impossible to debug and the only option left with you will be to repair/uninstall-install VS 2010… (i.e. proceed at your own risk :-))

    •  Step 2: Put following line of code in Microsoft.WebApplication.targets file just before closing of the Project node i.e. before </Project>...  
      <Import Project="$(MSBuildExtensionsPath)\Microsoft\VisualStudio\v10.0\Web\XmlDocumentTransform.targets" Condition="Exists('$(MSBuildExtensionsPath)\Microsoft\VisualStudio\v10.0\Web\XmlDocumentTransform.targets')" />
      The Microsoft.WebApplication.targets file is located at %ProgramFiles%\MSBuild\Microsoft\VisualStudio\v10.0\WebApplications... 

    image  
    NOTE: Changing the above targets file will allow you to use this functionality with all the Web Application Projects (WAPs), if you just want to change this for the current project then you can put the same Import node in .csproj or .vbproj as well...  If you use per project model then you can also check in this file into source code control and have your team use it seamlessly…

    • Step 3: Open your .csproj/vbproj file and insert the below property in <PropertyGroup> section  <AllXmlsToTransform>Settings.xml;app.config</AllXmlsToTransform>

    image

     NOTE: The Settings.xml or app.config can be replaced with the name of Xml files you want to transform…

    • Step 4: Insert <OnAfterTransformWebConfig>TransformXml;</OnAfterTransformWebConfig> similar to #3 above but do not modify the TransformXml; text here…  This is the actual hook which ties in your project to this generic XDT system...  After making the Step 3 & Step 4 changes your project file should have below content…

    image

    • Step 5: Create Setting.Debug.Xml or similar files and put XDT syntax in them... You need to make sure in the .csproj/.vbproj file of yours you have the DependentUpon property is set like the example below:
          <Content Include="Configuration\Settings.xml" />
          <Content Include="Configuration\Settings.Debug.xml">
            <DependentUpon>Configuration\Settings.xml</DependentUpon>
          </Content>
          <Content Include="Configuration\Settings.Release.xml">
            <DependentUpon>Configuration\Settings.xml</DependentUpon>
          </Content>

    image

    NOTE: The above will allow your solution to look pretty, i.e. just like web.debug.config and web.release.config files show nested under web.config, your *.$(configuration).* files will show nested under your parent file too…

    With the above 5 steps you are all set to use XDT with any of the deployment models covered in the Overview of Web Deployment Post…  In a way above steps harness the power of Web Publishing Pipeline (WPP) extensibility model and you can do several other extensions like above if you are familiar with MsBuild sytax…

    SAMPLE:   The remainder of the post is just showing you the steps to test whether the changes you made worked or not (i.e. the remaining half of the post is just playing with what you already accomplished in the first half)… :-)

    • To test the above target file I created the below MVC 2.0 project structure:

    image

    • Once you put DependentUpon node in your project file you will have to click the  “Show All Files” icon on the solution explorer for VB Projects to see Settings.Debug.Xml
    • My Settings.xml file looked as below:

    image

    • My Settings.Debug.xml file looked as below:

    image

    • To test out I tried simple “file system” publish (Right click on project and say Publish)… The new WAP Publish dialog for me looked as below:

    image

    • After publishing my C:\TestPublish folder looked as below:

    image

    • Note that Settings.Debug.xml was removed from my final publish location as it is not required for my web to function and the content of Settings.xml file were transformed and looked as below:

    image

    TeamBuild/Commandline Approach: You can also use your new transformations from TeamBuild/MsBuild by using the below command (from VS 2010 Command prompt if you are trying locally):

    MsBuild MyXDTTestProject.csproj /t:TransformXml

    The output of the command line transform should look as below:

    image

    As specified above your transformed XML will be stored in obj\$(configuration)\Settings.xml… 

    As such feel free to open the XmlDocumentTransform.targets file which you download, I have tried to put as much comments as I could to make it readable…  If you go through it I am sure you will be able to do many other cool things out of it…

    -Vishal

    Monday, April 26, 2010

    Xml Document Transform (XDT) Snippets for VS 2010

    During my PDC talk I had shown some of the snippets that can come handy while using Web.Config Transformations…  This post is intended to share the XDT snippets and instructions on how to install them to use them with VS 2010…

    image

    • After this the XDT snippets will be available for you to use within any XML file within VS 2010…

    To know how to use XDTs for Web.Config file please check out the post about Web.Config Transformations

    Few interesting points about Transforms & Locators which are worth noting to do pretty powerful stuff with your XML are:

    • Transforms  - Transforms act on a XML node i.e. from XDT engine standpoint the node on which a transform is found is plucked out of the document and passed as a node to the Transform itself (e.g. “SetAttributes” Transform)… The Transform class internally implements the logic of modifying the node with its own special logic (i.e. setting attributes in case of “SetAttributes” Transform) and returns back the node to the engine…  The XDT engine then replaces the new node into the document…  The engine also passes the handle of the parent node to the transform which the transform can then play around with (e.g. “Insert” Transform receives a new node as well as the parent node and has the DOM code of inserting the new node under the parent…)

    image

    • Locators – XDT usually traverses through the XML document and constructs the XPath all along e.g. when it hits the add node under connectionStrings in web.config it has already constructed the XPath (/configuration/connectionString/add)…  Locators help with narrowing down the XPath so that the correct node can be picked up… Check out the example below:
       <connectionStrings>
    <add name="1stDB"
    connectionString="Data Source=Server1;Initial Catalog=DB1;Integrated Security=True"
    xdt:Transform="SetAttributes" />
    <add name="2ndDB"
    connectionString="Data Source=Server2;Initial Catalog=DB2;Integrated Security=True"
    xdt:Transform="SetAttributes" xdt:Locator="Match(name)"/>
    </connectionStrings>


    Based on the standard logic of XPath traversing XDT will always pick up the first “add” node i.e. one with 1stDB in the example below… That may not be always desirable…  In XDT we could have implemented the logic to do special things for appSettings & connectionStrings but then that would have made XDT specific to web.config instead we implemented Locators which now allows XDT to be general purposes XML transformation engine…  In the above example if we use a Locator called xdt:Locator=”Match(name)” on the 2ndDB then as soon as the XDT engine encouters a locator it calls the class implementing it (i.e. “Match” and allows it to play with the XPath that is being generated… In this case the match locator will help construct the XPath as /configuration/connectionString/add[@name=’2ndDB’]


    xdt:locator


    The high level takeaway here is that when you play around with the snippets for XDT keep the above concepts for Transforms & Locators in mind and with the quick snippet explanations of each transforms and locators you should be able to very easily use all of them… If you encounter any issues plz feel free to reach out…


    Thanks!!


    -Vishal