Visual Studio 2010 has great features to make your web deployment easier… I have written a high level article describing the web deployment feature set of VS 2010 below:
Today my goal is to go through an end to end walkthrough of the Web 1-Click Publish feature of VS 2010… This walkthrough will cover following:
- Prepping up an ASP.NET 4.0 web application which is using a SQL Server Database for deployment
- Gathering the remote web and database server information
- Setting up Web.config Transformation to change your connectionString
- Including SQL Server Databases in Web Deployment
- Creating a 1-Click Publish Profile to Publish your web content, databases and transformed web.config files
- 1-Click Publish your Web Application
For this walkthrough you will need Visual Studio 2010 Beta1 which you can download FOR FREE from http://www.microsoft.com/visualstudio/en-us/products/2010/default.mspx
Let us get started…
Prepping up an ASP.NET 4.0 web application which is using a SQL Server Database for deployment
In this walkthrough we are assuming that you already have a web application which uses SQL Server database and you are ready to deploy it to remote web server and database server… If you do not have such a web application then I encourage you to follow the simple step by step instructions in the walkthrough Creating a simple .NET 4.0 web application using Visual Studio 2010…
With the assumption that you now have a data driven ASP.NET 4.0 web application let us try to understand what all is needed to be taken care of while deploying such a web application… Things that you need to take care of during such typical deployments are:
- You need to modify the connectionStrings in the web.config file to point to the remote SQL database server instead of the local SQL Server Express that you are using on your dev box…
- You need to deploy your databases to the remote SQL database server
- You need to deploy all of your master pages, content pages, images etc to the remote web server
In the remaining portion of this walkthrough you will see how to accomplish all of the above things…
But before getting to that, let me introduce you to Web Application we are about to deploy… The solution explorer of this web application looks as below:

Notice that this web application has 1-ClickPublish.mdf file in the App_Data folder… Also notice that it has a Site.Master, Default.aspx and Address.aspx Web pages… When you run Default.aspx it looks as below:

The top banner of “Visual Studio 2010 Web 1-Click Publish” is coming from Site.Master… The grid containing FirstNames & LastNames is being populated from the 1-ClickPublish.mdf file… The “View Addresses” button takes you to “Address.aspx” page which shows the addresses of the people on “Default.aspx” as shown below:

The web.config file of this web contains connectionString named “1-ClickPublishDB” which points to the SQL Server express database (1-ClickPublish.mdf )…
Gathering the remote web and database server information
Before we begin to deploy the web application to the remote server we will need to gather the information of the destination servers… Typically if you are going to a shared hoster then this information is provided to you in the welcome email from your web hosting company… Web hosters typically have various plans which include database as well as web server storage space….
If you are not planning to go to web hosting company but rather are interested in hosting your own web and database servers then you will have to follow some more additional steps to set up your web servers and database servers… I am not covering this in the current walkthrough but will cover the same in subsequent walkthroughs… But for now let us assume you have a web hoster who has provided you with the information required for deployment…
Typically web hosters will ask you which .NET Framework version you would like to target (i.e. 2.0, 3.0, 3.5 or 4.0)… Based on the .NET Fraemwork version you choose your web site will be provisioned with the correct Application Pool… For .NET 2.0, 3.0 and 3.5 the Application Pool targets CLR version 2.0… For .NET 4.0 the Application Pool is set to CLR version 4.0…. It is very likely that your .NET 2.0, 3.0 or 3.5 web application will run seamlessly on .NET 4.0 but it is still required to talk to your hoster to change you Application pool from .NET 2.0 to .NET 4.0…
If you register for a hosting plan which supports the new VS 2010, ASP.NET 4.0 and Microsoft Web Deployment Tool (MsDeploy) then you will receive below pieces of important information which we will use later during the walkthrough… In the rest of the walkthrough I will refer to these as “1-Click Settings” so that you can easily relate to this section…:-)
- Service URL: This URL is in the format https://myWebServer:8172/MsDeploy.axd and actually points to a IIS handler which will manage your deployment on the remote web server
- Site/Application Name: This is the name of your IIS Web Site on the remote web server… This is where your application will be deployed…
- UserName: This user name is the account which has the access to the ServiceURL and your Site on the remote web server
- Password: The password which you use for your above UserName
- ConnectionString: This is the ConnectionString to your remote database server… Typically your hoster will make sure that your remote web server and remote database server have the correct ports opened so that your web application can easily consume the data from your database…
At this time I am assuming that you have your web application ready to be deployed and you already have the above pieces of information from your web hoster… The next thing we will do now is to set up web.config transformation to modify your web.config file during deployment….
Setting up Web.config Transformation to change your connectionString
Let us assume that you are using “Release” build configuration when you are deploying to a remote web server… You can create and use a different build configuration as well but I am choosing “Release” as it comes out of the box with VS 2010… Learn more about Managing Build Configurations…
By default “Debug” is the ‘Active’ build configuration… As we are ready to deploy to a hoster you can change your Active build configuration to “Release”… You can do so by simply changing the drop down value on the VS “Standard” toolbar as shown below:

Alternatively you can also change the build configuration by going to the Build –> Configuration Manager menu…
After this step your Active Build Configuration should be “Release”… You can now open up the node next to the web.config file to reveal web.debug.config and web.release.config as shown below:

In case of VB.NET you will have to click the top right button to “Show all files” to see the dependent web.release.config…
Now open the web.config as well as web.release.config files and copy the connectionString section from the web.config file into the web.release.config file as shown below…
FROM

TO

Now you need to do two quick things
- Just simply write xdt:Transform=”Replace” in the connectionString node of web.release.config as shown below…
- Also change the connectionString attribute by putting the value that you got from the hoster (the one we referenced in “1-Click Settings” )… Let us say my hoster proived me with connectionString as “Data Source=myHostedSQLServer;Initial Catalog=myhostedDBName; User ID=VishalRJoshi; Password=*VS10Rocks” then my web.release.config should look as below…

Also note that by default Web.Release.config has a transform called “RemoveAttributes” to remove the debug attribute when you are going to the “Release” environment… Many hosted environment will not allow you to have debug=true coz it is not safe hence removing the debug attribute is required…
With this you have set up the automated web.config transformation which will take care of changing your connection string during every deployment… !! There is a lot more you can do with XML Document Transforms (XDT)… Check out the different possibilities Web.Config Transformations by leveraging XDT here…
Including SQL Server Databases in Web Deployment
As the current web application is actually using the data in 1-ClickPublish.mdf it is required to move the database schema and data from this local SQL Server Express database to remote hosted SQL Server database server… In order to make that happen you need to go to “Deploy SQL” tab of the Project properties…
You can open project properties by double clicking the “Properties” item under the project node as shown below:
![image_thumb10[2]](https://blogger.googleusercontent.com/img/b/R29vZ2xl/AVvXsEizJa7IVbhD4x3S02Pl6B7TofMG0ihsDBurTZKd4F8fb2rh5k35rbMPKHqLJLbFsP2-Cgomgg9Ld1SQj7QS-bZxJmWNH1PqtmU6Yf0q-SbV2e9UPOjtifh602L6QNVbJK8weX0/?imgmax=800 "image_thumb10[2]")
When project properties window opens then navigate to “Deploy SQL” tab…Once you open “Deploy SQL” tab you need to do following quick things:
Make sure you are using the “Release” configuration as that is the configuration we are going to deploy (and you also have web.config transformation for Web.Release.config)…
Click “Add” button and give a friendly name for your database deployment as shown below: (I would recommend using the name that you used for your connectionString – for secret reasons I will talk about in future posts :-))

Next you will have to configure the “1-ClickPublishDB” settings which you just created by clicking it… As soon as you click it the disabled section below will light up which you need to fill in as shown below…
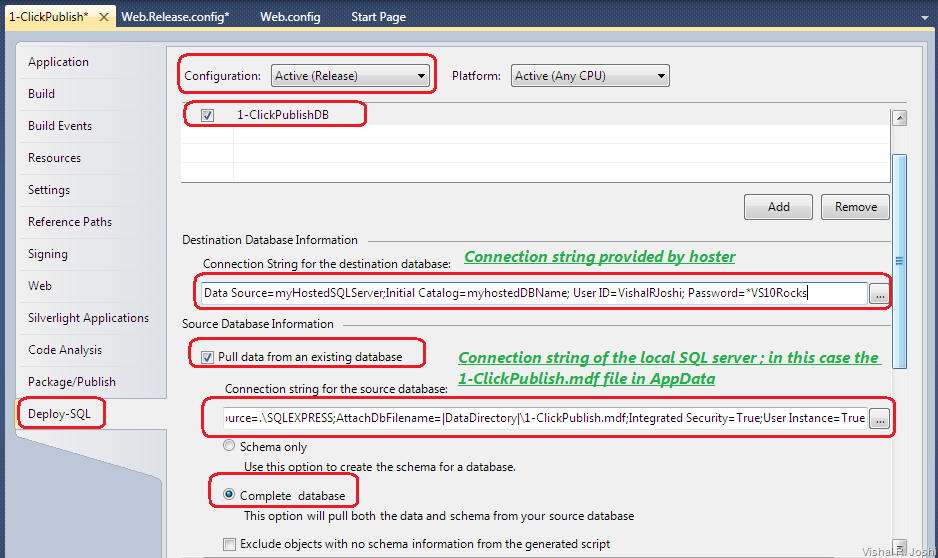
The key points to note while filling up the DB Deployment information above are:
- ConnectionString for the destination database is the connectionString which you received from hoster in an email (the one we referenced in “1-Click Settings” )…
- “Pull data from an existing database” will instruct Visual Studio 2010 to extract data from the local SQL Server…
- The connection string below the “Pull data from…” checkbox represents the source database (which is on your local dev box)… This connection string can be found in the original web.config file of your web application as the datasource controls you used insert the connectionString in web.config file…
- The “Complete database” radio button instructs Visual Studio 2010 to script both database schema as well as data from your database… If you contain junk data that you do not want to deploy to the server then choose “Shema only” option…
With these settings you can now hit save on top of Visual Studio and you have configured your database for deployment as well…Hopefully that was not too hard :-) If your needs are more deeper than the above then there are many other powerful Database Deployment options which I have discussed in DB Deployment post earlier…
Creating a 1-Click Publish Profile to Publish your web content, databases and transformed web.config files
Now that you have set up web.config transformation and also set up you database deployment settings, it is time to create a 1-Click Publish profile to use for your deployment…
You can do so by Right clicking on your project node and hitting “Publish…” as shown below:
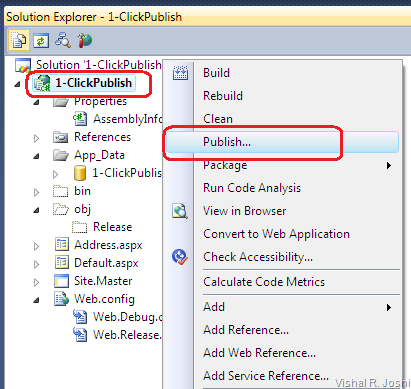
With that you will get the “Publish Web” dialog which you can fill as below:

I have specially numbered the fields above so that you can easily relate to them in the text below:
- Publish Profile Name- I have named it as myWebHosterName you can name it with the destination name that you can easily remember… Usually if you are going to a web hoster then naming this as something like “DiscountAsp” or “OrcsWeb” would be advisable…
- Service URL: As we discussed in the “1-Click Settings” section at the beginning of the post, this is provided to you by your hoster… This URL associated with the Publish Method “MsDeploy” which is used behind the scenes by Visual Studio 2010 to Publish your entire web… You can learn more about the way MsDeploy works in one of my previous blog posts… Also while you are at it note that the new “Publish” dialog also tells you the Build Configuration that you are publishing (i.e. the Active Build Configuration), in our situation we are using the “Release” configuration for which we have set up the DB Deployment and Web.config transformation…
- Site/Application Name: As we discussed in the “1-Click Settings” section at the beginning of the post, this is also provided to you by your hoster… If your hoster provided VishalRJoshi.com as your Site name you can feel free to append a folder name underneath it e.g. VishalRJoshi.com/Blog…
- Mark Folder as IIS Application on destination: If you choose to Publish to a folder under the parent site eg “VishalRJoshi.com/Blog” AND want to have separate session state, cache etc functionality for that subfolder then you will have to convert that folder into an IIS Application underneath your parent web site… This checkbox will allow you to achieve that easily in an hosted environment… This is a the additional IIS enhancement that was made as part of “MsDeploy” Publish Method, so we hope you will like it…:-)
- Allow untrusted certificates- MsDeploy Publish method will only take https:// URLs… As you know that secure http requires a SSL certificate but it is understood that it will not be possible to always buy a certificate from authorities like VeriSign etc and especially if you are deploying within your team environment then expecting a fully signed certificate may not be rational, hence this option allows the web server owner to provide a self signed SSL certificate… Although, in general it should be understood that checking this box increases threat on the data which is being transferred over the wire…
- User Name, Password and Save Password: Again, As we discussed in the “1-Click Settings” section at the beginning of the post, User Name and Password is also provided to you by your hoster… “Save Password” is a feature in VS 10 which will securely save your password, so that you do not have to keep typing it again and again…
- Save - Now you can hit the Save button on the top, to save the “Publish Profile” you just created…
- Close – Close button will allow you to close the “Publish Web” dialog
After doing all of the above you have configured your Web Application for 1-Click Publish going forward…
1-Click Publish your Web Application
For your convenience Visual Studio 2010 offers Web 1- Click Publish toolbar as shown below:

You can enable this toolbar (if not visible) by going to View—>Toolbars—> Web One Click Publish… You can now simply click the Publish button below after every little change you make to your project that you want to deploy…

This way you can keep updating your web at the destination with ease… Do note that you are allowed to have upto 50 Publish profiles per project, which can allow you to Publish the same project to 50 different web servers in just clicks (I hope 50 should be enough, if not let us know now and we will be happy to bump that up :-))…
NOTE: If you are incrementally publishing you web then you should go to “Deploy SQL” tab and uncheck your database deployment… If you do not do so then your Publishing will fail as MsDeploy intentionally does not overwrite the database that you already have on the server… There is a easy fix to change that behavior i.e. there is an option to delete database every time you republish, but I will refrain from mentioning it until someone asks as that is purely a Test server scenario… :-)
Checking your deployed Web
With all of the above steps you are good to hit the “PUBLISH” button… Once you hit the button your web should get deployed to the hoster much more quickly and reliably than ever before…
With all this you are now set up to have 1-Click Publish of your web application from Visual Studio 2010…
In later posts I will share the Performance and Scalability numbers of MsDeploy Publish method too but as far as I can tell MsDeploy publish is quite more reliable and performant than most other traditional web publishing mechanisms…
I hope this walkthrough will help you experience the new powers of Visual Studio 2010 and Microsoft Web Deployment Tool…
If you would like to learn more about Web Deployment with VS 2010, then I have explained a bunch of other features in the posts below:
Hope this walkthrough is helpful
-Vishal
Some KB Items: There are certain known issues and workarounds which you may or may not encounter but I have still posted them here in case you face any of those… Known Issues, Resolutions and Work-Arounds for VS 10 Web 1-Click Publish…


![image_thumb10[2]](https://blogger.googleusercontent.com/img/b/R29vZ2xl/AVvXsEgQZ0ffnFEbR-VKXYj-Sd4WIDUU8L_zA9Q6trwoKQGcqWRAEsqjXZZ8WZcXoxZIxnCA6t8ZqGPzH5fUVjb7mj_S1hGLf-a3mMpyxsmj_l6xHQ5S9cMNPuiXwSF2mvD8f-iE_-E/s1600-h/image%5B32%5D.png "image_thumb10[2]")


