Showing posts with label DB Deployment. Show all posts

Saturday, October 31, 2009

VS 2010 Beta 2 Read Me Items for Web Deployment

There are some known issues/bugs related to VS 2010 Web Deployment features in VS 2010 Beta 2 Read Me… I can imagine reading the entire Beta 2 read me file can be daunting so I thought I can just copy paste the ones related to Web Deployment here…

DB Deployment will fail if the Database Name is longer than 127 characters

Description: If you are using latest VS 2010 Web Deployment Features and trying to deploy your database using the Deploy SQL property page then at times you might get error from VSMsDeploy task. 

There might be several reasons for the failure including connection and authentication issue but a current bug in the product does not allow you to script schema/data from a database (typically SQL Express MDF file) if the file path is longer than 127 characters.  In the OS like XP or Win2K3 the default path for the VS project & its default ASP.NET Login/Profile DB could be something like C:\Documents and Setting\... \Visual Studio 2010\Projects\MyProject\App_Data\ASPnet_DB.mdf... This path can potentially exceed 127 characters and result into Deployment failure...

Workaround: The easy work around is to have the project copied to a location where the path will not exceed 127 characters for e.g. C:\MyProject\App_Data...  This issue will eventually be resolved in the product...

Some VS 2010 Web Deployment Features will not work if VS 2010 is installed on Vista RTM instead of Vista SP1

Description:  If you are using the new Web Deployment feature set in VS 2010 and are using the below features which integrate with MSDeploy:

then you will have to use Vista SP1 instead of Vista RTM as your OS.

Workaround: MsDeploy requires features which are built inside Vista SP1 and hence trying to run Web Deployment features on Vista RTM fails.  This is a required dependency so you will have to use Vista SP1 as your OS for VS 2010.  Do note that you can still use any other operating system like XP, Win2K3, Win2k8 R2, Win7 etc to install VS 2010 and use the Web Deployment features, it is just advised that any of the OS versions that you use are updated with the latest Service Packs so that all the required dependencies are in place.

MsDeploy.exe.config file will be required to run Web Deployment on machines with .NET 4.0 only

Description: If you installed VS 2010 on a clean machine which does not have .NET 2.0 (e.g Win2K3)  and are trying to use the VS 2010 Web Deployment Features then when you run the deploy.cmd file to install your web package you might receive error stating "Msdeploy.exe -.NET Framework Initialization Error Unable to find a version of the runtime to run this application."  This is due to the fact that VS 2010 comes with only .NET 4/CLR4 and and CLR 4 does not allow CLR 2.0 executables to run  without having an explict exe.config file…  If you are using other .NET 2.0/3.0 or 3.5 exes on a box with just .NET 4 then you might face similar issues with those EXEs too…

Workaround: You can easily work around this by going to "%Program Files%\IIS\Microsoft Web Deploy" (& additionally also on "%Program Files (x86)%\IIS\Microsoft Web Deploy" folders and create following msdeploy.exe.config file in there

<configuration>
<startup useLegacyV2RuntimeActivationPolicy="true">
<supportedRuntime version="v2.0.50727" />
<supportedRuntime version="v4.0" />
</startup>
</configuration>


This issue will be fixed in the future releases of the product.


-Vishal

Tuesday, September 22, 2009

Overview Post for Web Deployment in VS 2010

In past few months I and my team have written several blog posts on VS 2010 Web Deployment features… In VS 2010 there was a lot of investment made in Web Deployment and over next few months we will be writing more on the subject…

Below is the list of all the posts for easy reference:

Overview of VS 2010 Web Deployment

Web Packaging (Put your web into a .zip file)

Web.Config Transformation (Change Web.Config files per deployment environment)

Database Deployment

Web Publishing (Push you web from one machine to another)

Tips & Tricks for Web Deployment

Walkthroughs

Hope you will enjoy the VS 2010 Web Deployment features…

Thanks,

-Vishal

Tuesday, August 04, 2009

Replacing your old DB with new one using VS 2010

Earlier in the below blog posts we had talked about how to Deploy your DB using VS 2010…

Today I wanted to share how you can replace your old DB with a new one using VS 2010 DB Deployment.

Before we get into it please note that using this method you are essentially going to get rid of your old DB schema as well as data and replace it with the new one…  You should make sure that you do not turn this setting on accidentally as there will be no way to revert it back if you accidentally drop your DB content… !!

So with that understanding and with the assumption that you have already, configured your DB for deployment for use with Web Packaging OR 1-Click Publish; let us proceed:

After configuring your DB for Deployment your “Deploy SQL” Property tab should look something like below:

Deploy SQL Tab

If you look at the above UI, you will notice that there is no UI option to drop your database objects during Packaging or Publishing… This was an intentional decision as we did not want anyone to accidentally check that box and regret later… Although you can do this by manually by editing your project file…

To do that you will have to Right Click on your project and click “Unload Project” as shown below:

Unload Project

Once you unload your project you will have an option to Edit your project file as shown below:

image

Alternatively you can also open your project folder and edit the project file in notepad…

If you have your DB deployment configured in “Deploy SQL” tab (shown above) of your project properties then you should find following XML schema in the project file:

<PublishDatabaseSettings>
      <Objects>
        <ObjectGroup Name="MyDB" Order="1" Enabled="False">
          <Destination Path="" />
          <Object Type="dbFullSql">
            <PreSource Path="your connectionString value" ScriptDropsFirst=”True” ScriptSchema="True" ScriptData="False" SchemaQualify="False" CopyAllFullTextCatalogs="False" />
            <Source Path="obj\Debug\AutoScripts\MyDB_SchemaOnly.sql" />
          </Object>
        </ObjectGroup>
      </Objects>
</PublishDatabaseSettings>


If you notice carefully you should see that in the “PreSource” node above I have


additionally inserted a special attribute called ScriptDropsFirst=”True”, this attribute will tell the Web Publishing Pipeline (WPP) to insert DROP statements while scripting your DB…


In nutshell the PreSource node tells VS 2010 about your source DB and the options you would like to use while script it… ScriptDropsFirst is only one of the options but there are several others properties that you can set to control the scripting of your DB which are mentioned in SMO Scripting Options.


The option of ScriptDropsFirst will not drop your Database it will simply drop the objects inside the Database… If you would also like to drop the Database and recreate it you should use the option dropDestinationDatabase=”True”. If you are deploying to a hoster like DiscountASP or OrcsWeb you should NOT use dropDestinationDatabase option as most likely you will not have the permission to do so and even if you did the chances are that you will not have an option to recreate it and you might have to land up calling the support center…  Hopefully if you are deploying to a hosted server then you will not need to drop the DB and just dropping the schema and data inside it will be sufficient…


Anyways, once you have set these attributes  on your preSource node you can now save the project file and reload it… After that next time you Package or Publish your deployment will first drop all the tables, columns and data in your destination DB and then recreate it using the newly generated SQL script…


-Vishal

Thursday, July 09, 2009

10 + 20 Reasons why you should Create a Web Package

Before we talk about the reasons why you should create a Web Package let us first understand what is a web package… Web Package is an atomic, transparent, self describing unit representing your web application which can be easily hydrated into any IIS Web server to reproduce your web…  It is a .zip file which not only contains your content but also contains its dependencies like IIS Settings, Databases, GAC DLLs, Registry Keys etc…

The concept of creating Web Packages for deploying your web application to an IIS Web Server is recently introduced with Microsoft Web Deployment Tool (MsDeploy) and towards the end of this post I will talk about how you can create a Web Package for your web app… But before going there let me talk about the 10 reasons why you should consider creating web packages for your web application:

  1. Having all your web content and dependencies like IIS Settings & DB into a single .zip file allows you to easily transport it anywhere…
  2. If the web package actually contains source code then you can replicate your dev environment to another box relatively easily…  Imagine being able to recreate a project on your home machine by simply emailing yourself a .zip file…
  3. If you are deploying in a web farm environment then deploying the web package to various server boxes will allow you to very easily recreate your load balanced web servers…
  4. If you are creating software for community to use then sharing web package .zip files with world creates a common handshake model…
  5. Web Application Gallery, which will be common home to find reusable Web Applications also uses the same Web Package format… So you will have an opportunity to put up your web app into Web Application Gallery if you create a Web Package…
  6. Most of the Package creation process is very automated so you do not need to write custom actions like you would have to do in case of MSIs…
  7. Creation of Web Packages can be automated along with your nightly builds really easily using MsBuild with systems like Team Build…
  8. You can create a web package for various versions of your web application and easily use the versioned packages to roll back to any version you like…
  9. You get free standardized UI to install the Web Packages in IIS Manager which hopefully will become pretty standard and easy for everyone to understand…  If you do not like to use the UI the package can be installed via commandline as well…:-)
  10. Most of the automated tools (providers) required for packaging  your web application and its dependencies are available out of the box (few of which are IIS Settings, SQL DBs, Web Content, GAC assemblies, COM components, Registry keys etc)… 

Finally let me mention the out of the box providers which can be invoked when you want to package your web application…  You actually have a choice to call any of these providers depending on what parts of your Web Application you like to be packaged… These are my other +20 reasons why you should create a web package…

  1. File System Directory to move a files & folder which contains your web application files like .aspx, .config, images, .js, .css, .master etc – contentPath
  2. Creating a new IIS Web Application for your web– iisApp
  3. Moving IIS7 and above (read Vista, Win2k8, Win7, Win2k8 R2 and above) Configuration Settings associated with your web (e.g. Default Document, ApplicationPool Mapping etc) – appHostConfig
  4. IIS5.1 & 6 (read XP, Win2K3 compatibility)  Metabase Configuration Settings (parallel to IIS7+ settings above) - metakey
  5. Pulling data & schema from existing SQL Server Database or custom generated .SQL files which your web uses– dbfullSQL
  6. Any Security Certificates (e.g. SSL & ClientAuth) that your web depends upon- cert
  7. Any GACed assemblies like 3rd party controls or libraries that your web uses – gacAssembly
  8. Any custom IIS7+ Application Pool that your web has created– appPoolConfig
  9. Registry key associated with your webs – regkey
  10. 32 bit COM Object – comObject32
  11. 64 bit COM Object – comObject64
  12. Security ACLs associated with folder – setAcl
  13. Granular control by pulling just a registry value - regValue
  14. ASP.NET root web configuration file on 32 bit machine – rootWebConfig32
  15. ASP.NET root web configuration file on 64 bit machine – rootWebConfig64
  16. Similar type of support for packaging MySQL DB – dbMySQL
  17. Packaging Machine.Config of 32 bit machine – machineConfig32
  18. Packaging Machine.Config of 64 bit machine – machineConfig64
  19. If there is still a provider missing then you can very easily create one – yourCustomProvider
  20. A secret provider which I am not allowed to talk about just yet :-), but trust me it is really a killer provider - secretProvider

So now that you have 10 +20 reasons to create a web package let us talk about how to create one… From end developer/IT pro standpoint you can create Web Packages from various different avenues, some of which are:

Please follow the links above to create a web package using your preferred method… I hope you are jazzed about being able to archive and deploy your web applications using Web Packaging…

Tuesday, July 07, 2009

Importing a Web Package into IIS Manager

Today I am hoping to talk about installing/importing a Web Package into IIS using IIS Manager…

For this walkthrough you will first need a Web Package… If you want to get few ready made packages you can get them from Web Application Gallery…  There is also a MsDeploy package of BlogEngine.NET available on CodePlex, which you can download to try out this walkthrough…

Hopefully, eventually you will be creating your own web packages for deployment and this walkthrough will even apply at that time…  If you want to learn how to create a web package from Visual Studio 2010 then read the below posts:

To begin importing a web package into IIS using the new “Import Application” wizard you need to make sure that you have installed IIS Manager by going to Add/Remove Windows component…  You will also need MsDeploy installed over IIS, typically it will come with your VS 2010 installation but if you do not have VS 2010 just yet then you can download it from MsDeploy Download.

Today, I will install a Web Package of the sample ASP.NET 4.0 web application that I created earlier in the tutorial “Creating a simple ASP.NET 4.0 Web Site”…

To start importing the web package let us start IIS Manager (Start –> Run –> InetMgr)

I will be installing the web package under Default Web Site…  Although it is not required to install the package under Default Web Site, it can be installed under any Web Site of your choice… Also if the package created was a “IIS Web Site Package” then it could be installed under the server /sites node directly as well…  In anycase when we open the “Default Web Site” node then on the right side command bar you will now notice two new commands  1.) Export Application 2.) Import Application as shown below:

Import Application

On clicking “Import Application” on the first screen you will be asked to provide the path to web package (.zip file)… I will be providing the location of the sample web package which I created in the earlier tutorial:

image

On clicking next the Import Application wizard will display the content of the web package as below:

Package Content

Notice that in the above example the package wizard shows that the Web Package contains:

  1. IIS 7 Application - This will actually do the job of creating an IIS Application and mapping the virtual directory…  It will also move any additional IIS Settings associated with the web application…
  2. File System Content  - All the physical files (.aspx, .dlls etc) which need to be placed in the web site directory…
  3. Database – This is the database that I packaged into my web package

On clicking “Next” I will get a screen which I will call as the “Parameters” screen…  When you create a package using VS 2010, then VS identifies the key attributes of your web application which you need to customize and it creates MsDeploy parameters for the same…  All these parameters are something which you can modify during the package import process as seen below… Parameters Screen
In the above example notice that “Default Web Site” is read-only… This is due to the fact that the “Import Application” wizard was invoked from Default Web Site… I am now naming the Web As “SimpleASP4Web” and placing it under “C:\WebSites\SimpleASP4Web”…  Also note that I am using “SimpleASP4Web” DB on my local SQL Server…

The ConnectionString that I am providing in here will be used to deploy my packaged DB and will also be used to update my web.config file (this will happen only if the package was created to do so…  I will write a separate blog post on how to do that, but in future release of VS 2010 this option will be set by default when you create the web package at the first place…)

In any case now on clicking “Next” the Web Application installation will begin showing you a progress bar and hopefully within no time the web package will get installed showing you the status as below:

Installation Progress

On hitting “Finish” on this screen the web package will be installed and on inspecting the IIS Manager you can see that the package is actually successfully imported and web site is ready to go:

Deployed Web in IIS

On inspecting the SQL Server Management Studio you can also see the Simple ASP4Web DB also installed:

SimpleASP4Web DB

Hopefully you can see that the web deployment features with great UI options in VS 2010 and IIS will make the process of packaging and installing you web applications much easier than what it has been before…

-Vishal

Sunday, May 31, 2009

Known Issues, Resolutions and Work-arounds for VS 10 Web 1-Click Publish

There are certain known issues and workarounds which you may or may not encounter while using VS 2010 Web 1-Click Publish but I have still posted them here in case you face any of those and want to debug your deployment problems…

  • If you receive 502- Bad Gateway error then go to Internet Explorer –> Connections –> LAN Settings –> and uncheck the “Automatically detect proxy settings” and after that you should be good to go…
  • At times within Intranet environments if ISA Server or alike is not running then you may get errors like “VsMsdeploy failed.(Request to remote agent URL 'https://myWebServerName:8172/msdeploy.axd?site=myWebSite’ failed.) Error Details:Unable to connect to the remote server. OR The remote name could not be resolved… “   The resolution for the above issue is to enable the ISA server and re-run you deployment…
  • If you get an error about your .mdf file being used by some other process then the resolution for this issue is to right click on your MDF file under App_Data folder and click “Detach”…  The other typical culprit which holds an handle to the .mdf file is the Server Explorer… You can try to close the server explorer and try publishing again too… Finally, I hate to say it but if nothing works then you can restart VS…  This is a known bug and will be resolved in the future releases of Visual Studio 2010…!!
    •  

Web 1-Click Publish with VS 2010

Visual Studio 2010 has great features to make your web deployment easier…   I have written a high level article describing the web deployment feature set of VS 2010 below:

Today my goal is to go through an end to end walkthrough of the Web 1-Click  Publish feature of VS 2010…  This walkthrough will cover following:

  • Prepping up an ASP.NET 4.0 web application which is using a SQL Server Database for deployment
  • Gathering the remote web and database server information
  • Setting up Web.config Transformation to change your connectionString
  • Including SQL Server Databases in Web Deployment
  • Creating a 1-Click Publish Profile to Publish your web content, databases and transformed web.config files
  • 1-Click Publish your Web Application

For this walkthrough you will need Visual Studio 2010 Beta1 which you can download FOR FREE from http://www.microsoft.com/visualstudio/en-us/products/2010/default.mspx

Let us get started…

Prepping up an ASP.NET 4.0 web application which is using a SQL Server Database for deployment

In this walkthrough we are assuming that you already have a web application which uses SQL Server database and you are ready to deploy it to remote web server and database server…  If you do not have such a web application then I encourage you to follow the simple step by step instructions in the walkthrough Creating a simple .NET 4.0 web application using Visual Studio 2010

With the assumption that you now have a data driven ASP.NET 4.0 web application let us try to understand what all is needed to be taken care of while deploying such a web application… Things that you need to take care of during such typical deployments are:

  1. You need to modify the connectionStrings in the web.config file to point to the remote SQL database server instead of the local SQL Server Express that you are using on your dev box…
  2. You need to deploy your databases to the remote SQL database server
  3. You need to deploy all of your master pages, content pages, images etc to the remote web server

In the remaining portion of this walkthrough you will see how to accomplish all of the above things…

But before getting to that, let me introduce you to Web Application we are about to deploy… The solution explorer of this web application looks as below:

1-ClickPublish solution explorer

Notice that this web application has 1-ClickPublish.mdf file in the App_Data folder…  Also notice that it has a Site.Master, Default.aspx and Address.aspx Web pages…  When you run Default.aspx it looks as below:

Default.aspx

The top banner of “Visual Studio 2010 Web 1-Click Publish” is coming from Site.Master…  The grid containing FirstNames & LastNames is being populated from the 1-ClickPublish.mdf file…  The “View Addresses” button takes you to “Address.aspx” page which shows the addresses of the people on “Default.aspx” as shown below:

Address.aspx

The web.config file of this web contains connectionString named “1-ClickPublishDB” which points to the SQL Server express database (1-ClickPublish.mdf )…

Gathering the remote web and database server information

Before we begin to deploy the web application to the remote server we will need to gather the information of the destination servers… Typically if you are going to a shared hoster then this information is provided to you in the welcome email from your web hosting company…  Web hosters typically have various plans which include database as well as web server storage space….

If you are not planning to go to web hosting company but rather are interested in hosting your own web and database servers then you will have to follow some more additional steps to set up your web servers and database servers…  I am not covering this in the current walkthrough but will cover the same in subsequent walkthroughs…  But for now let us assume you have a web hoster who has provided you with the information required for deployment…

Typically web hosters will ask you which .NET Framework version you would like to target (i.e. 2.0, 3.0, 3.5 or 4.0)… Based on the .NET Fraemwork version you choose your web site will be provisioned with the correct Application Pool… For .NET 2.0, 3.0 and 3.5 the Application Pool targets CLR version 2.0… For .NET 4.0 the Application Pool is set to CLR version 4.0…. It is very likely that your .NET 2.0, 3.0 or 3.5 web application will run seamlessly on .NET 4.0 but it is still required to talk to your hoster to change you Application pool from .NET 2.0 to .NET 4.0… 

If you register for a hosting plan which supports the new VS 2010, ASP.NET 4.0 and Microsoft Web Deployment Tool (MsDeploy) then you will receive below pieces of important information which we will use later during the walkthrough… In the rest of the walkthrough I will refer to these as “1-Click Settings” so that you can easily relate to this section…:-)

  • Service URL:  This URL is in the format https://myWebServer:8172/MsDeploy.axd and actually points to a IIS handler which will manage your deployment on the remote web server
  • Site/Application Name: This is the name of your IIS Web Site on the remote web server…  This is where your application will be deployed…
  • UserName: This user name is the account which has the access to the ServiceURL and your Site on the remote web server
  • Password:  The password which you use for your above UserName
  • ConnectionString: This is the ConnectionString to your remote database server… Typically your hoster will make sure that your remote web server and remote database server have the correct ports opened so that your web application can easily consume the data from your database…

At this time I am assuming that you have your web application ready to be deployed and you already have the above pieces of information from your web hoster…  The next thing we will do now is to set up web.config transformation to modify your web.config file during deployment….

Setting up Web.config Transformation to change your connectionString

Let us assume that you are using “Release” build configuration when you are deploying to a remote web server…  You can create and use a different build configuration as well but I am choosing “Release” as it comes out of the box with VS 2010…  Learn more about Managing Build Configurations… 

By default “Debug”  is the ‘Active’ build configuration… As we are ready to deploy to a hoster you can change your Active build configuration to “Release”… You can do so by simply changing the drop down value on the VS “Standard” toolbar as shown below:

build configuration

Alternatively you can also change the build configuration by going to the Build –> Configuration Manager menu…

After this step your Active Build Configuration should be “Release”…  You can now open up the node next to the web.config file to reveal web.debug.config and web.release.config as shown below:

web.release.config

In case of VB.NET you will have to click the top right button to “Show all files” to see the dependent web.release.config…

Now open the web.config as well as web.release.config files and copy the connectionString section from the web.config file into the web.release.config file as shown below…

FROM

web.config connection string

TO

web.config with connection string

Now you need to do two quick things

  1. Just simply write xdt:Transform=”Replace” in the connectionString node of web.release.config as shown below…
  2. Also change the connectionString attribute by putting the value that you got from the hoster (the one we referenced in “1-Click Settings” )… Let us say my hoster proived me with connectionString as “Data Source=myHostedSQLServer;Initial Catalog=myhostedDBName; User ID=VishalRJoshi; Password=*VS10Rocks” then my web.release.config should look as below…

final web.release.config

Also note that by default Web.Release.config has a transform called “RemoveAttributes” to remove the debug attribute when you are going to the “Release” environment…  Many hosted environment will not allow you to have debug=true coz it is not safe hence removing the debug attribute is required…

With this you have set up the automated web.config transformation which will take care of changing your connection string during every deployment… !! There is a lot more you can do with XML Document Transforms (XDT)…  Check out the different possibilities Web.Config Transformations by leveraging XDT here…

Including SQL Server Databases in Web Deployment

As the current web application is actually using the data in 1-ClickPublish.mdf it is required to move the database schema and data from this local SQL Server Express database to remote hosted SQL Server database server… In order to make that happen you need to go to “Deploy SQL” tab of the Project properties…

You can open project properties by double clicking the “Properties” item under the project node as shown below:

image_thumb10[2]

When project properties window opens then navigate to “Deploy SQL” tab…Once you open “Deploy SQL” tab you need to do following quick things:

Make sure you are using the “Release” configuration as that is the configuration we are going to deploy (and you also have web.config transformation for Web.Release.config)…

Click “Add” button and give a friendly name for your database deployment as shown below: (I would recommend using the name that you used for your connectionString – for secret reasons I will talk about in future posts :-))

Add new connectionString

Next you will have to configure the “1-ClickPublishDB” settings which you just created by clicking it…  As soon as you click it the disabled section below will light up which you need to fill in as shown below…
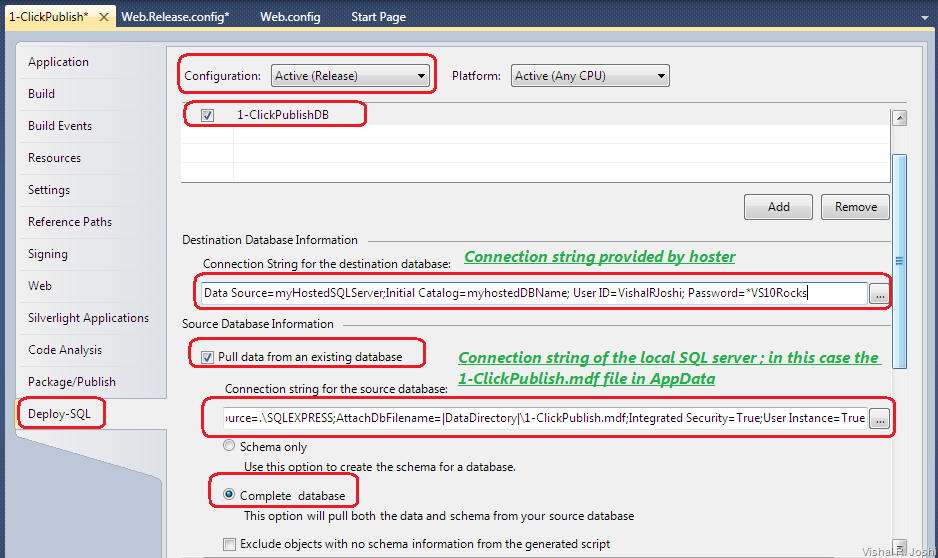
Deploy SQL tab

The key points to note while filling up the DB Deployment information above are:

  • ConnectionString for the destination database is the connectionString which you received from hoster in an email (the one we referenced in “1-Click Settings” )…
  • “Pull data from an existing database” will instruct Visual Studio 2010 to extract data from the local SQL Server…
  • The connection string below the “Pull data from…” checkbox represents the source database (which is on your local dev box)… This connection string can be found in the original web.config file of your web application as the datasource controls you used insert the connectionString in web.config file…
  • The “Complete database” radio button instructs Visual Studio 2010 to script both database schema as well as data from your database…  If you contain junk data that you do not want to deploy to the server then choose “Shema only” option…

With these settings you can now hit save on top of Visual Studio and you have configured your database for deployment as well…Hopefully that was not too hard :-)  If your needs are more deeper than the above then there are many other powerful Database Deployment options which I have discussed in DB Deployment post earlier

Creating a 1-Click Publish Profile to Publish your web content, databases and transformed web.config files

Now that you have set up web.config transformation and also set up you database deployment settings, it is time to create a 1-Click Publish profile to use for your deployment…

You can do so by Right clicking on your project node and hitting “Publish…” as shown below:
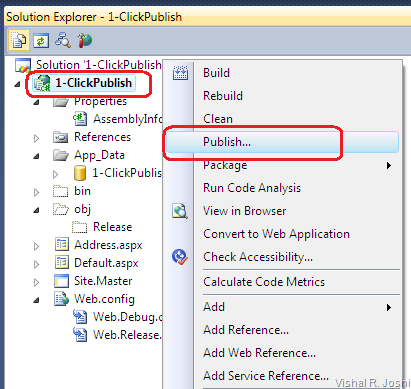
Right Click Publish

With that you will get the “Publish Web” dialog which you can fill as below:

Publish Dialog

I have specially numbered the fields above so that you can easily relate to them in the text below:

  1. Publish Profile Name-  I have named it as myWebHosterName you can name it with the destination name that you can easily remember…  Usually if you are going to a web hoster then naming this as something like “DiscountAsp” or “OrcsWeb” would be advisable…
  2. Service URL:  As we discussed in the “1-Click Settings” section at the beginning of the post, this is provided to you by your hoster…  This URL associated with the Publish Method “MsDeploy” which is used behind the scenes by Visual Studio 2010 to Publish your entire web… You can learn more about the way MsDeploy works in one of my previous blog posts…  Also while you are at it note that the new “Publish” dialog also tells you the Build Configuration that you are publishing (i.e. the Active Build Configuration), in our situation we are using the “Release” configuration for which we have set up the DB Deployment and Web.config transformation…
  3. Site/Application Name: As we discussed in the “1-Click Settings” section at the beginning of the post, this is also provided to you by your hoster…  If your hoster provided VishalRJoshi.com as your Site name you can feel free to append a folder name underneath it e.g. VishalRJoshi.com/Blog…
  4. Mark Folder as IIS Application on destination: If you choose to Publish to a folder under the parent site eg “VishalRJoshi.com/Blog” AND  want to have separate session state, cache etc functionality for that subfolder then you will have to convert that folder into an IIS Application underneath your parent web site…  This checkbox will allow you to achieve that easily in an hosted environment… This is a the additional IIS enhancement that was made as part of “MsDeploy” Publish Method, so we hope you will like it…:-)
  5. Allow untrusted certificates-  MsDeploy Publish method will only take https:// URLs… As you know that secure http requires a SSL certificate but it is understood that it will not be possible to always buy a certificate from authorities like VeriSign etc and especially if you are deploying within your team environment then expecting a fully signed certificate may not be rational, hence this option allows the web server owner to provide a self signed SSL certificate… Although, in general it should be understood that checking this box increases threat on the data which is being transferred over the wire…
  6. User Name, Password and Save Password:  Again, As we discussed in the “1-Click Settings” section at the beginning of the post, User Name and Password is also provided to you by your hoster…  “Save Password” is a feature in VS 10 which will securely save your password, so that you do not have to keep typing it again and again…
  7. Save -  Now you can hit the Save button on the top, to save the “Publish Profile” you just created…
  8. Close – Close button will allow you to close the “Publish Web” dialog

After doing all of the above you have configured your Web Application for 1-Click Publish going forward…

1-Click Publish your Web Application

For your convenience Visual Studio 2010 offers Web 1- Click Publish toolbar as shown below:

image

You can enable this toolbar (if not visible) by going to View—>Toolbars—> Web One Click Publish… You can now simply click the Publish button below after every little change you make to your project that you want to deploy… 

image

This way you can keep updating your web at the destination with ease…  Do note that you are allowed to have upto 50 Publish profiles per project, which can allow you to Publish the same project to 50 different web servers in just clicks (I hope 50 should be enough, if not let us know now and we will be happy to bump that up :-))…

NOTE:  If you are incrementally publishing you web then you should go to “Deploy SQL” tab and uncheck your database deployment… If you do not do so then your Publishing will fail as MsDeploy intentionally does not overwrite the database that you already have on the server…  There is a easy fix to change that behavior i.e. there is an option to delete database every time you republish, but I will refrain from mentioning it until someone asks as that is purely a Test server scenario… :-)

Checking your deployed Web

With all of the above steps you are good to hit the “PUBLISH” button…  Once you hit the button your web should get deployed to the hoster much more quickly and reliably than ever before…

With all this you are now set up to have 1-Click Publish of your web application from Visual Studio 2010…

In later posts I will share the Performance and Scalability numbers of MsDeploy Publish method too but as far as I can tell MsDeploy publish is quite more reliable and performant than most other traditional web publishing mechanisms…

I hope this walkthrough will help you experience the new powers of Visual Studio 2010 and Microsoft Web Deployment Tool…

If you would like to learn more about Web Deployment with VS 2010, then I have explained a bunch of other features in the posts below:

Hope this walkthrough is helpful

-Vishal

Some KB Items:  There are certain known issues and workarounds which you may or may not encounter but I have still posted them here in case you face any of those… Known Issues, Resolutions and Work-Arounds for VS 10 Web 1-Click Publish

Saturday, May 30, 2009

Database Deployment with Visual Studio 10

Visual Studio 2010 (VS 10) Beta1 was released recently...  You can download VS 10 Beta1 from Microsoft download page….

Do check out the update on Visual Studio features for Web Developers on our team blog…

We have been discussing about a bunch of deployment features previously and today we will discuss about Database Deployment with VS 10….

VS 10 will allow you to deploy your databases both while creating a web package as well as while publishing directly to a web server provided by your hoster…

To catch up on the previous web deployment posts check out the below links:

  • Web Deployment with VS 2010 and IIS
  • Web Packaging: Creating a Web Package using VS 2010
  • Web Packaging: Creating web packages using MSBuild
  • How does Web Deployment with VS 10 & MSDeploy Work?
  • Installing Web Packages using Command Line
  • Web.config Transformation


    Apart from the “Package/Publish” tab, with VS10 we will now have a new tab called “Deploy-SQL” in the project properties of Web Application Projects (WAPs)

    The “Deploy SQL” tab looks like below:

    Deploy SQL tab

    Firstly let us note that this tab is Build configuration aware i.e. you can configure different settings for “Release” vs “Debug” environment… I have set the configuration to “Release”  and Platform to “Any CPU” for the above example…

  • TIP:  If you are deploying to a hosted environment then you can create different build configurations per hoster e.g. “DiscountASP” or “OrcsWeb”, this way you can configure various Database deployment settings per hoster…  You can use the same principle for various different database servers you are going to even within your intranet…

    Anyways, the first grid on “Deploy SQL”  tab looks like below and actually is a MASTER part of MASTER-DETAIL view of your Database Deployment Settings.  Every Database Entry in the grid below is a representative of a group of database settings representing source and destination database information:

    connectionString name grid

    i.e. Database Entry (Friendly Name) = Source Database Information + Destination Database Information

    My advice would be to create one entry per every destination database you are deploying to…  The reason why I am emphasizing destination database is coz many folks want to deploy more than one source databases to a single destination database…

    One classic example of this is when you are using ASP.NET membership or login features then ASP.NET automatically creates ASP.NET DB in your project AppData directory, apart from this people also like to create a separate ApplicationDB which has the application specific business data.  As you can imagine this results into two different source DBs.  When you are trying to deploy to a shared hosting environment then many times you are paying per database to your hoster and the obvious thought “my ApplicationDB does not conflict with ASP.NET DB in anyway, I am happy to have both of the DBs to go to the same destination DB without paying for two databases”…  In such a situation you would want to create one database entry in the grid above for every destination connection string that you have.

    The “Add” button at the bottom allows you to add a “Friendly Name” for your Database Entry…  If you would like to go to more than one destination database you can feel free to add as many Database Entries in the grid above as you want… For simplicity of tracking I would recommend using your connectionString name as the Friendly Name in the grid above.

    As you might have already noticed each entry in the grid also has a check box next to it…  The reason why this check box is provided is so that once you configure the database entry then you do not have to completely remove it  by clicking “Remove” button (and loose all the configured data)… If you do not want to include a  particular database Entry (friendly name) in a particular deployment scenario you can simply exclude it by un-checking the checkbox. 

    In order to permanently “Remove” the database entry you can select the entry to be removed and can click the “Remove” button….

  • Let us now take a look at the details of a database entry (e.g details of “productsDB” in the above example).  As I mentioned above the details are going to be broken down into two major categories…

    1. Destination Database Information

    2. Source Database Information

    _____________________________________________________________________________________________________

    Destination Database Information: This section looks as below:

    destination database information

    It is relatively simple, coz all it contains is connection string for the destination database… Typically when you get a hosted account your hoster will send you the connection string of your hosted database in an email.  This connectionString should go into the above text box.

    This field is kept optional and the reason behind it is that if you are using Web Packaging as a model for your deployment and are likely to hand over the web package to your system administrator or someone who will provide connectionString at install time then you can feel free to leave this field empty. 

    Do note that if you are directly publishing to a hoster (i.e. not packaging) and you have left this field empty then you will get an error during publishing.

    __________________________________________________________________________________________________

    Source Database Information: This section looks as below:

    source database information

    The first thing you will see in the Source Database Information is a check box which indicates “Pull data from an existing database” … If you have a local SQL Server database (SQL 2005 or 2008) which you are using for development then this will allow you to extract your database to deploy to the destination database (mentioned in the section above)….

    The first setting under “Pull data from an existing database” is Connection string for the source database… This text box is enabled only when you check the check box for “Pull data from…”  You can also click the “…” button next to the connection string text box which will launch the connection String builder dialog as below:

    connectionString Builder

    This dialog can help you easily create the connection String for your local database…

    The next set of controls under the source connection String text box allow you to determine what kind of SQL Script would like to generate from your source database.  Currently there are two options available…

    Schema Only  - Choosing this will only script the schema of your source database

    Complete Database – Choosing this will script both schema and data of your source database

    On your dev SQL Server it is likely that you might have some test data, in that situation you would want to choose “Schema Only” option which will only pick up the DB schema leaving out the data…  On the other hand if you choose complete database everything from your source database will be scripted…

    Insider Note:  VS 10 Database Deployment is using SQL Management Objects (SMO) behind the scenes to script your database…  SMO is a tried and tested API for scripting huge databases… scriptSchema & scriptData are SMO scripting options which Visual Studio is setting when you choose one of the options above…

    The next check box is “Exclude object with no schema information” which will give you further fine grain control on scripting your database.  If you do not care about schemaQualify feel free to uncheck this checkbox…

    Database Source Scripts -  You might have noticed that in this section there is already an entry called “[Auto-generated Schema Only]”… This entry is added to the source database scripts as soon as you check the “Pull data from an existing database”… At the bottom of Database Source Scripts grid you will notice “Add Script” and “Remove Script” button…  These buttons will allow you to add & remove extra .SQL scripts as your source…

    Most of the times developers or DBAs create .SQL scripts to deploy databases…  These custom .SQL scripts can be added and ordered in the grid (and thereby during deployment) using the up and down arrows…  The “[Auto-generated Schema Only]” is a representative of the script that VS will automatically generate from your source database, it is added to the grid so that you can order it up and down along with the rest of the .SQL scripts that you might want to add…

    Also note that if you are generating your .SQL scripts via tools like Visual Studio Database Edition (Data Dude) or Red Gate then you can add those scripts here to be included in your web package as well. 

    NOTE: There is a way to set up automated build and deployment environment in which you can collect .SQL scripts from Data Dude or Red Gate and provide to VS 10 during web deployment.  I will cover this topic separately in a different blog post…

    _________________________________________________________________________________

    The last section of the “Deploy SQL” tab is a place for you to provide Database Deployment notes so that you can note specific steps you took or scripts you used while deploying databases; this is purely for your reference purposes…. The deployment notes section looks as below…

    Database Deployment Notes

    Once you have provided all of this information you are good to deploy your databases using Visual Studio 2010 Web Deployment…

    Web Packaging  + DB Deployment

    After setting up your DB deployment as shown above you can now right click on your project and hit Package –> Create Package as shown below…Create Package

    The package created as a result will contain your database…  You can read details about creating and installing the web packages below:

  • Web Packaging: Creating a Web Package using VS 2010
  • Web Packaging: Creating web packages using MSBuild
  • Installing Web Packages using Command Line
  •  

    Web Publishing + DB Deployment

    Once you set up the DB then not only will it get included in Web Packages but will also be available to be deployed via Publishing…  You can publish you project by right clicking on your project and hit Publish as shown below…

     Publish

    I will soon write a detailed post on how to use the new “Publishing” features of Visual Studio 2010…

    Hope this information was useful…

    -Vishal