Showing posts with label Web Dev Tools. Show all posts

Thursday, June 11, 2009

How to make Content Web Pages to use existing Master Page

Let us say you want to add a new page Page1.aspx to use Site.Master…  Lets say that Site.Master already exists in your project…

If you were to add Page1.aspx as a simple .aspx page then you will have to make manual change to the <%@ Page directive of the page to make sure Inherits property is set correctly… But generally you will not need to do this if you add the file in the below fashion…

WEB SITE PROJECTS: If you are using a Web Site Project (i.e. below)

new web site

Then in that case you can Right click on your project –> Add New Item and “Select Master Page”

new web form

On the next page you will get an option to select the master page as shown below:

Web Site Master

WEB APPLICATION PROJECTS (WAPs):   If  you are using a WAP (i.e. File –> New Project as shown below)

new WAP

Then while adding a new page, right click on your project—> Add –> New Item and instead of selecting “Web Form” select “Web Content Form” as shown below:

web content form

When you now click the “Add” button you will get to select the Site.Master page that you had previously added to your project… Check the figure below…

web form site master

Hope this helps…

- Vishal | Twitter: @VishalRJoshi |

Tuesday, February 24, 2009

Web Packaging: Creating web packages using MSBuild


This post is next in the series of VS 2010 articles that we have been putting together to dive into the Web Deployment improvements with VS 2010 and IIS.  I would recommend reading the the preceding posts to get an overview of all the scenarios supported:

In this post I will cover web package creation using MSBuild command line.  Many medium to large sized teams plan on automating their build process for various good reasons like predictability for QA team, time saving as compared to on-demand manual build, early bug detection with Build Verification Tests (BVTs), knowing the current state of project integration, etc… Many argue that setting up the build system is not worth the trouble for a small project running only a few months; I would suggest otherwise, believe me setting up an automated build process once will pay you back   enough just within a few weeks and will get you into a mode where in the future doing this will be so much more easier… 

Anyways, if you choose to automate your build process there are various tools and technologies available out there, some of the popular ones are:

You can certainly take your build automation process to its best by using Continuous Integration model which we will discuss in subsequent posts.

In anycase, the entire Web Deployment story in VS 2010 uses MSBuild behind the scene which means that all the UI features in Visual Studio are actually wrappers over the underlying MSBuild Targets, Tasks and Properties.  In the previous post we talked about “Creating a Web Package using VS 2010” where we discussed setting up the Package properties in “Package Tab” of the project’s property pages as shown below:

All the properties that you set up in this UI are stored in your .vbproj or .csproj file.  We also talked about this tab being “Configuration” aware, which means that you can set different properties per build environment like Debug, Testing, Staging, Release/Production etc and all of these properties will be saved in your project file.

Now if you would like to create a web package using MSBuild it is much more simpler than you can imagine:

All you have to do is open  command prompt which has MSBuild path preset (e.g. Visual Studio Command Prompt which is available under Visual Studio 2010 –> Visual Studio Tools) and type the below command:

MSBuild "YourFullyQualifiedProjectName.csproj/vbproj" /T:Package

/T:Package is the MSBuild Target named Package which we have defined as part of implementation of the Web Packaging infrastructgure.

Interestingly, when you do not specify any MSBuild target, then for most projects “Build” is the default target hence just providing below command line simply builds your project

MSBuild “YourProject.csproj”

Also note that there can be various dependencies set between targets and our “Package” target has an explicit dependency on “Build” target which means that if the “Build” was not successful then “Packaging” will not even begin, this ensures that during your automated packaging you do not land up spending resources on creating faulty web packages.

By default MSBuild uses the “Debug” configuration but if you would like to create a package for your Staging configuration all you would have to do is:

MSBuild "ProjectName.csproj/vbproj" /T:Package /P:Configuration=Staging

/P:Configuration represents the Property named Configuration which you are setting to Staging…

Diving a tiny bit deeper - If you open your project file in a text editor then you should be able to see all the properties which we talked about from UI perspective in our previous post “Creating a Web Package using VS 2010”…  All these properties will not be visible in the project file until their default values are modified (just a tiny optimization to keep the files smaller and agile :-)). These same properties are optionally settable from command line as well...  Also there are certain properties which are not manifested in the UI or in the project file by default, but are still available behind the scene to provide extensibility and fine grain control that many expect, we will go into the details of those properties in later posts as well.

Anyways, most of the time you should be able to set most of your properties in the UI and use them without much modification in the command line scenario, although it is conceivable that some of the properties may require frequent modification during automated builds e.g. “Package Location”.  Below is a sample command of how you will set up the PackageLocation property along with the Configuration property:

MSBuild "MyProjectName.csproj" /T:Package /P:Configuration=Staging;PackageLocation="D:\Vishal\Package.zip"

When I run the above command then my package for “Staging” configuration will be created in “D:\Vishal\Package.zip”

It is important to note that items passed via command line override the values set in the project file, this ensures that most common values of the properties can be stored in the project file and eventually shared by the entire team…  The ones which need to be momentarily overridden during build time can be set from the command line. 

Also it is good to remember that if you like to pass more than one property to MSBuild command then you can do so by separating multiple properties by semicolon ; as shown above for Configuration and PackageLocation.

The above command line examples can very easily be plugged into automated build systems like CC.Net, TFS, etc, we will look into the process of setting some of these environments in later posts as well.

For now, I hope you will be able to envision the prospects of creating these Web Packages in an automated fashion and share them across your teams on regular basis.

Sunday, February 08, 2009

Web Packaging: Creating a Web Package using VS 2010

In the earlier post I highlighted various investments that we are making in Visual Studio 2010 and IIS to make Web Deployment easier.  You can read that post below:

Deploying a web project with all its correct dependencies is not a trivial task. Some of the assets which need to be considered during deployment are:

  • Web Content (.aspx, .ascx, images, xml files, PDBs, Binaries etc)
  • IIS Settings (Directory browsing, Error pages, Default Documents etc)
  • Databases that the web project uses
  • GAC Assemblies and COM components which the web project depends upon
  • Registry Settings that may be used within the web project
  • Security Certificates
  • App Pools

In an enterprise environment a web application with all of its dependencies needs to move across various environments before being finally being deployed to a production server.  A typical set of transition servers are development, testing/QA, staging/pre-production and production.  Also on the production environment there are web farms where these webs need to be replicated.  Today doing all these things is more or less a manual process and involves a tons of documentation that both developers and server admins have to deal with.  Even with all the documentation the steps are certainly very much prone to errors.

To aid all these scenarios we are introducing the concept of  a "Web Package". Web Package is an atomic, transparent, self describing unit representing your web which can be easily hydrated onto any IIS Web server to reproduce your web.  VS 2010 uses MSDeploy  to create the web package from your web application.

In today's post I will be primarily focusing on creating a web package from VS 2010 which has IIS Settings as well as web content.

The package created by VS can be installed using UI in IIS Manager as well as command line, we anticipate that developers eventually will give the web packages to server administrators who will be able to inspect/verify the package and then install them on the server...  I will cover package installation topic in subsequent post...  But for now let us learn how to create a web package

Step 1: Configure your Web Application Project (WAP) to use IIS Settings

For this discussion we have BlogEngine.Web downloaded from codeplex and converted it into a WAP.  Then this project was opened in VS 2010  and the VS10 migration wizard moved the project into VS10 format.  Thanks to the multi-targeting  features in VS 2010 which can support .NET versions 2.0 till 4.0; hence it is up to you which Framework version you want to run your web against.    I have also configured this blog application to use IIS Web Server for development (Learn how to do so by clicking here). 

At the end of this step my solution explorer looks as below:

image

Step 2: Configure IIS Settings in IIS Manager

Most IIS 7 web applications use IIS integrated pipeline which is configured with "Default App Pool" of IIS.  Blog Engine .web does not use integrated mode and will throw an error shown below if made to run under "Default App Pool".

image

To get rid of this error I changed the App Pool of this application to "Classic App Pool" (Learn how to do so by clicking here) and then the application runs great as shown below:

image

App Pool mapping is just one of the IIS setting which your app may use, there are various other IIS Settings which you can configure using IIS Manager (e.g. Default document, Error pages etc etc); all of these settings are relevant based on your application scenario... The good news is that VS 10 & MSDeploy will auto detect all the changes you make to the default IIS settings and pick it up for deployment...

Essentially, at the end of this step you should have your web application up and running with all the IIS settings configured in IIS Manager. 

Step 3: Configure Package Settings

In VS 2010 we have introduced one additional property page for WAPs called "Publish" as shown below:

image

Let us look at various properties of the this tab to understand how it works:

Configuration Aware Tab: Note that the Publish tab is build configuration aware:

image

  • The Publish tab is made configuration aware as deployment settings tend to change from environment to environment; for e.g. many a times developers want to deploy their “Debug” configuration on a Test Server and include PDBs as part of this deployment. When the same web is deployed in “Release” configuration on a production server the deployment may exclude PDBs.  (Learn how to manage build configurations by clicking here)

Items to Package/Publish – This section will help you decide what type of content you would really like to package/deploy.

  • Types of Files: By default this option is set to "Only files needed to run this application" .  This is usually sufficient for your deployment as it includes all the files from your project except source code, project files and other crud files not required to be deployed...  But apart from that there are two additional options available as shown below...

image

"All files in this project" and "All files in this project folder" options are very similar to what Publish WAP options were in VS 2008...  I had written an earlier post explaining these options here...  In subsequent posts I will also dig into various other interesting ways of using these options.

  • Exclude Files from App_Data folder – “App_Data” folder is a special ASP.NET folder where many developers like to put their SQL Express DBs (.mdf/.ldf files), XML files and other content which they consider Data. In many situations on production web server a full version of SQL Server is available and using SQL Express is not all that relevant. In such scenario (and for the corresponding build configuration e.g “Release” ) a user can check the “Exclude Files from App_Data”. image
  • Exclude Generated Debug Symbols – It is important to understand that generation of debug symbols is different from deployment of the same. This check box will tell VS 10 whether you would like to package/deploy the already generated Debug Symbols (Learn more about deploying debug Symbols here). 

Package Items

image 

  • IIS Settings  - Checking this checkbox informs VS10 that you are ready to take all of your IIS Settings configured for your application in IIS Manager as a part of your web package.  I am glad to tell you that IIS 5.1, IIS 6 as well as IIS 7 environments are supported as part of this feature hence whether you are working on XP, Win2K, Win2K3, Vista or Win2K8 you should have no issue with packaging IIS Settings...  

These setting includes the "App Pool mapping" your web is configured to run against (e.g. "Classic App Pool" mapping discussed in Step 2)

  • Additional Settings -   The items in this grid are advanced properties.  It is still good to know about these coz it impacts what will be included in your package.  Most of the properties in this grid are related to the entire server and not just to your application so you should use them very carefully. 

Currently VS10 only displays "Application Pool Settings" but behind the scene it is possible to configure VS10 to support packaging root web.config, machine config , security certificates, ACLs etc...  

I wrote a small tips & trick about differences between Application Pool Mapping and Application Pool Settings which will help clarify the implications of such advanced settings; you can read more about it here.

Package Settings

image

  • Create MSDeploy Package as a ZIP file - This checkbox allows you to decide whether you would like to create your web package as a .zip file or as a folder structure. If you are concerned about the size and are moving the web package around very often then I can see you using .zip format for the package; on the other hand if you care to compare two packages using diff commands (either of source control or independently) then I can see you using the folder format.
  • Package Location - This is an important and required property as it defines the path at which Visual Studio will place your web package. If you choose to change this path make sure that you have write access to the location. Do note that the Package Location is modified based on whether you choose to create the web package as a .ZIP file or vs a folder structure.
  • Destination IIS Application Path/Name - This property allows you to give IIS Application name that you will use at the destination Web Server.
  • Destination Application Physical Path - One of the most important information which is embedded inside the web package is the physical location where the package should be installed. This property allows you to pre-specify this embedded information.  You will have an opportunity change both IIS Application Physical Path as well as Application Name at the time of deployment but in this property page you are given an opportunity to choose a default value.

Step 4: Create the "Web Package"

This is the last step in creating the web package and the simplest too...  The idea is that once you configure the above settings creating a package should be easy; in fact even if you do not go to the "Publish" tab we have tried to set smart defaults so that in most normal circumstances creating web package should be just the below two steps:

image

  • Right Click on your "Project"
  • Click on Package --> Create Package

Once you click on this command you should start getting output messages around your package creation pumped into your output window... 

When you see “Publish Succeeded” as below in the output window then your package is successfully created.


image

To access the package go to the location specified in the “Package Location” textbox. By default this is in obj/Configuration/Package folder under your project root directory (Configuration here implies Active Configuration like Debug/Release etc).

clip_image002

Note: "Create Package" command creates web package only for Active configuration. By default “Debug” is the active configuration inside Visual Studio. If you would like to change the Active configuration you can do so by using Build --> Configuration Manager as described here. You can certainly set properties for all available configurations by switching the configuration on top of the “Publish” tab but that action does not change the Active configuration


Finally, you can also automate creation of web packages via your team build environment as everything discussed above is supported via MSBuild Tasks.  In subsequent posts we will get into the details of these areas too...

Hope this helps...

Tips & Tricks: Deploying Generated Debug Symbols for your Web

Many developers always generate debug symbols so that they can be used to debug even the production environment if need be and to a great extent this can be considered as a best practice, but that does not mean that organizations deploy their Debug Symbols.

If you would like to generate debug symbols for your application you can do so by going to the “Build” tab in the Property Pages and clicking “Advanced” bottom at the bottom. Here you will have different options for the level of debug symbols you would like to generate for your Web Application Projects (WAP)

C#

image

VB

image

Generation of Debug symbols can be configured per "Build Configuration"...  To learn more about managing build configurations click here

Hope this helps...

Monday, February 02, 2009

Web Deployment with VS 2010 and IIS

Today, deploying a web application is not as easy as it should be. Whether you are deploying your web to a shared hosting environment and paying monthly to maintain it OR whether you have a web server/s managed by your enterprise, there are a lot of manual steps involved in getting your application from point A to point B.

If you are deploying your web application to a shared hoster then today you have to use technologies like FTP which take a long time to get your web content to the hosted server. After deploying your content you have to manually go to hoster control panel and install your database by running sql scripts and configure various IIS settings like marking a folder as an application to isolate it from the rest of the application.

If you are in an enterprise environment and you want to get a web application deployed you have to systematically document each step that your server admins and DBAs have to perform. In most circumstances you also have to ask your admins to modify the web.config files and go to IIS Manager and configure your settings apart from deploying your web content. Your DBA has to do the necessary steps of running the sql scripts in the right order to get your DB up and running. Such installations many a times take hours to complete.

With Visual Studio 2010 and IIS Web Deployment Tool (MsDeploy.exe / Web Deploy) we are introducing a set of technologies which can seamlessly deploy your applications taking care of the problems stated above. Microsoft Web Deployment Tool is a free download available on the web… You can download MSDeploy from below location:

http://blogs.iis.net/msdeploy/archive/2008/10/29/the-web-deployment-tool-beta-2-is-now-available.aspx

Do note that installing Visual Studio 2010 will automatically install MSDeploy for you. Visual Studio 2010 CTP can be downloaded from below location:

http://www.asp.net/vwd/

Web Deployment feature sets in VS 2010 can be broken down into following major areas:

1. Web Packaging - VS 2010 uses MSDeploy to create a .zip file for your application which we call as a web package. This file contains meta data + the below artifacts

· All of your IIS Settings (e.g. application pools, error pages etc)

· Web Content (e.g. .aspx, .ascx, .js, images etc)

· SQL Server DB

· Various other artifacts like Security Certs, GAC Components, Registry etc

A web package can then be taken to any server and installed either via IIS Manager UI Wizard or even via command line or API for automated deployment scenarios.

2. Web.Config Transformation – With VS 2010 web deployment we are introducing XML Document Transform (XDT) which will allow you to transform your development time web.config file to production/deployment time web.config file. The transformation is controlled by web.config TRANSFORM files named web.debug.config, web.release.config etc. The naming of these files is tied to the MSBuild configuration you are trying to deploy. The transform file will need just the changes that you really want to make to your deployed web.config… You can control the type of changes by instructing the XDT engine using simple and easy to understand syntax…

e.g. the below syntax in web.release.config will replace the connectionString section with new values in the web.config file which is produced for deployment of your release configuration.

clip_image002

3. DB Deployment – VS 2010 allows you to deploy your application along with all of its dependencies including database dependencies on SQL Server. Just by providing the connection string of your source database VS10 will automatically script its data/schema and package it for deployment. VS will also allow you to provide custom .sql scripts and also sequence them correctly to run on the server. Once your DB is packaged along with your IIS Settings and web content you can choose to deploy it to any server by providing the connection string at the install time.

4. 1-Click Publish - VS 2010 will allow you to not only package your web applications with all of its dependencies but also use IIS remote management service to publish the application to remote server. VS 10 will now allow you to create a publish profile of your hoster account or of various testing servers and save your credentials securely so that going forward you can deploy to any of these publish profiles with just one click using Web One Click toolbar. With VS 10 you will also be able to publish using MsBuild command line so that you can configure your team build environment to include publishing in continuous integration model.

To learn in further details about these technologies please view the videos here.

ALSO MAKE SURE YOU VISIT THE OVERVIEW POST FOR WEB DEPLOYMENT…

Friday, August 22, 2008

Web Application Projects - Publish Options

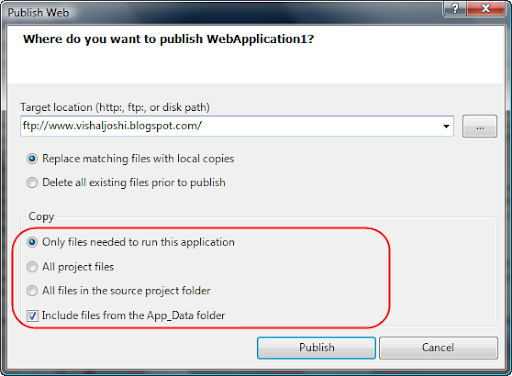
In Web Application Projects (WAPs) we have the following Publish Dialog box.

image


It has the target location text box which takes destination to be HTTP (which uses Front Page Server Extensions (FPSE) behind the scenes), FTP, or File System.

Publish settings also allows you to have a clean install or just incremental updates.  Although what is interesting to notice are the various Copy options.  Let us try to understand what these mean:

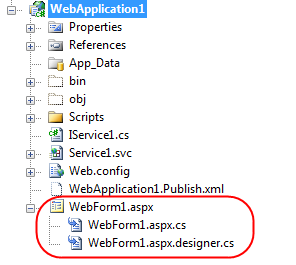
  • Only files needed to run this application - In a WAP we usually have a Project file, User File,  Bin folder, Obj Folder, ASP.NET pages, User Controls, WCF and Web Services etc.  ASP.NET Pages and other similar files have two additional artifacts in a WAP project as shown below:

image When you build the WAP project the sources from both the .aspx.cs as well as .aspx.designer.cs files are taken and compiled into the intermediate output folder (i.e. OBJ folder) and then finally moved to the (BIN folder)...   

You do not really need the Project Files (.csproj/.vbproj); User File (.user)  to run your web neither do you need any of the code behind or designer files as they are compiled into your Bin folder.  At the same time you also do not need the OBJ folder as that is just the intermediate folder VS uses before produces the final output in the BIN folder.  Based on this rationale VS removes all those files from the publishing process and only publishes the files which are required to run your application (which are your .aspx and other similar markup files), your referenced DLLs and your bin folder.

  • All Project Files - Based on the above discussion it is apparent that your code behind and designer files are part of your project, so are your .user and .csproj/.vbproj...  If you select this option then your entire project with these files is published to remote location.  You can usually use this option to move your working project to any remote location and get working on it without having to do a physical copy of select files.  If you want to share your project with your friends over FTP this is a good option to use. Do note Publish feature does not publishes OBJ folder as it is not a folder that a user should really be worried about, it is just for temporary compilation use.
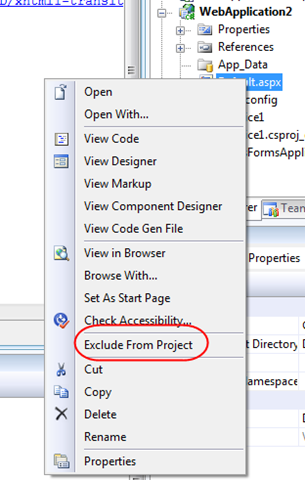
  • All files in the source Project Folder - Many a times users chose to exclude files from their projects by choosing the "Exclude From Project" command

image

This command essentially removes the artifact from the Project File, although do note that these files are still present in your source project folder.

Apart from this many a times users want to add help files, read me files, references docs (e.g. requirements doc) and other misc items in their project folder while they do not really want to publish these artifacts most of the time.

By choosing "All files in the source Project Folder" you can take all these files (excluding OBJ) folder and transfer it to any remote location via HTTP, FTP or simple disk IO to a UNC location.

The above three options kind of provides all the dials for a user to choose the appropriate publish option applicable to them.

  • Include files from the App_Data folder - App Data folder might potentially contain huge files and sensitive data, hence it is given a special status and you can choose whether or not you would like to publish your App_Data folder or not.  It is selected by default as VS assumes that you need the Data to run your application but if you really do not have anything in the App_Data folder or if you are hoping to use SQL Server in production (as opposed to MDF files & SQL Express during development) then you should go and uncheck this box.

Hope this summary of "Publish" feature for Web Application Projects helps...

Friday, March 07, 2008

ASP.NET MVC Framework Preview 2 (Mix 2008) Resources

I am attempting to compile the relevant resources for ASP.NET MVC Framework Preview 2 at one place so that you will not have to keep searching around...


ASP.NET MVC Preview 2 Download Location:
Preview 2 Download (English-US) - Microsoft.com download location to get the latest MVC bits...

ASP.NET MVC Documentation:
Home Page - Asp.Net home page where you can find latest updates on ASP.NET MVC Framework in general...
User Documentation - The official Microsoft user documentation on ASP.NET MVC Framework...
Readme File - Contains a ton of information on how to install the preview 2 and how can it play well if you already have MVC Framework Preview 1, Silverlight etc...

ASP.NET MVC Learning
Forums - There is a ton of activity on ASP.NET MVC Framework forums, this is a great way of getting your questions answered...
Videos - There are some great quick start videos on ASP.NET MVC Framework available here, we will be adding more videos here going forward to do keep checking

ASP.NET MVC Blogs
Scottgu's Tutorials Root - Scottgu has a bunch of very walk-through on ASP.NET MVC Framework here...
ASP.NET Tooling Overview - In this post I have explained the tooling features for ASP.NET MVC Framework...
MVC Unit Test Framework Integration - In this post I have explained how you can integrate a new test framework like NUnit, MBUnit, xUnit etc into your MVC Application.
NUnit & Rhino Mocks Integration - In this post Joe has taken a NUnit and Rhino Mocks framework as an example and he has created a Test Project Template for you to download... I will highly encourage you to check this out...
Phil Haack's Blog - Phil keeps writing interesting posts about ASP.NET MVC Framework... It would be nice to routinely check his blog too...
My Blog - I also intend to keep posting ASP.NET MVC Framework articles on my blog regularly so you might want to check that out too...
Scott Hanselman's Blog - Scott has some ASP.NET MVC Zen stuff on his blog too, do find time to check that out...

ASP.NET MVC CodePlex Source Code
http://www.codeplex.com/aspnet - CodePlex Home Page for ASP.NET
MVC Preview 2 Source Code - CodePlex location to download MVC Preview 2 Source Code


Hope this helps...

Monday, March 03, 2008

On Demand Webcast : Visual Studio 2008 for Web Developers

VS 2008 brings a great deal of features for Web Developers...  As a part of VS 2008 launch I did a web cast on MSDN on Feb 26th 2008.  Below are few of the features that I did demos on, hope you will enjoy it:

  1. Multi-Targeting
  2. Split View & Nested Master pages
  3. CSS Features (Manage Styles, Apply Styles, CSS Properties & Summary)
  4. ASP.NET List View Control and Ajax
  5. Javascript Intellisense and Type inferencing
  6. Javascript Referencing & Commenting
  7. Calling Services (.asmx & .svc )from Javascript
  8. Javascript Debugging
  9. Web Deployment Projects (WDP) for VS 2008

REPLAY URL : https://www.livemeeting.com/cc/mseventsbmo/view?id=1032369517&role=attend&pw=A6176DF3

Sunday, February 24, 2008

Webcast: New Enhancements for Web Developers in VS 2008


Wanted to update you on a upcoming web cast that I am doing in support of Visual Studio 2008 launch event...

Title: New Enhancements for Web Developers in VS 2008

Date/Day: Tuesday, February 26th 2008

Time: 11am to 12:30pm Pacific Standard Time (PST)

Description :Get an overview of how Visual Studio 2008 takes web development to the next level. See highlights of the key new Web tools experiences in the Visual Studio 2008 product including support for multi-Targeting,  JavaScript enhancements, rich support for CSS standards, rapid development of data-bound web pages using LINQ To SQL, and more. Also learn about the new Web Application Project and Web Deployment Project enhancements to Visual Studio which adds an alternative Web application development, build and deployment models to the Visual Studio project system.  Also have a sneak preview of the work being done for Web Developers in out of band releases like ASP.NET MVC Framework.

Registration URL:

http://msevents.microsoft.com/CUI/EventDetail.aspx?EventID=1032369517&Culture=en-US

Hoping you will be able to join!!

Friday, January 25, 2008

Visual Studio 2008 Web Deployment Projects (WDP) Releases to Web

Just some time ago I made an announcement on our team blog about release of WDP 2008... It has been a very exciting journey to reach at this point...

We had received an enormous participation for December 2007 CTP and community had provided us with a lot of interesting feedback... We had to balance out between features and timeline as usual... There are many customers who were not able to move ahead with Visual Studio 2008 installations because of unavailability of WDP 2008 and we did not hold so many folks from using VS 2008 hence releasing early was definitely important...

That said, I think the current version of WDP 2008 is a fine balance of speed to market and features... In fact I think this release has quite a few value added features:

  • New Features of Visual Studio 2008 Web Deployment Projects are as below... You can read in detail about these features on the post which announced December 2007 CTP of VS 2008 WDP (Click here to go to the December 2007 CTP post)
    • Migration from WDP for VS 2005 to WDP for VS 2008
    • Replacing WDP output only if Pre-Compilation succeeds
    • Creating IIS Applications
    • Using aspnet_merge.exe version which is installed with Visual Studio 2008
  • Core WDP Features

To find out more about the release visit the link below:

http://blogs.msdn.com/webdevtools/archive/2008/01/25/announcing-rtw-of-visual-studio-2008-web-deployment-projects-wdp.aspx

At the end I feel really proud to to call out the efforts of the heros behind WDP, my team members... Alison Lu has done a great job of testing WDP and reproducing every possible scenario that we heard from blogs, forums or connect system... Wendy Wei our dev on WDP got to the bottom of multiple issues that were raised... Bill Hiebert is our Architect and is always the support mechanism of the team... Anna Lidman is our Release Manager and makes our release process so smooth that we practically have forgotten the pains of going to the web... Tim McBride is our Dev lead and John Dundon is our test lead on WDP and have always been great partners to work with...

I hope you enjoy this release of WDP as much as we have enjoyed releasing it and hope it makes your pre-compilation and deployment challenges easier to deal with...

Happy Deploying!!

Saturday, December 01, 2007

Web Deployment Projects for VS 2008 Dec 07 CTP Released

Today after more than two months of effort our team released the Dec 07 CTP of Web Deployment Projects (WDP)... We were receiving one or more requests nearly every week since last few months to have WDP out for Orcas so I am sure that this release will enable a tons of web developers to adopt VS 2008 and use the latest and greatest features that come along with...

I have created a blog post on our team blog which talks more about this release... You can click here to view the post (http://blogs.msdn.com/webdevtools/archive/2007/12/01/web-deployment-projects-wdp-for-visual-studio-2008-december-2007-ctp-released.aspx)...

I want to mention that we have a great team in Visual Studio Web Developer... Honestly, the team rocks, often time we never know who make these technologies happen and so to name a few those people are Wendy Wei, Alison Lu, John Dundon, Tim McBride, Bill Hiebert, Anna Lidman, Bradley Millington, Bradley Bartz, Omar Khan and others...  Hope you enjoy the release...

I will keep posting other tips and tricks around WDP on this blog in the weeks to come so do visit once in a while...

Saturday, September 08, 2007

Joining Visual Studio Web Team

It has been a while since I wrote and hence it is a little strange to write... It seems like past 1.5 years of my work life has been hidden somewhere and that is kind of true as well... Hopefully I will be able to write about it in next 2-3 months, but anyways the reason for today's post is a little different...

I wanted to let you folks know that I am joining Visual Studio Web Developer team from Sept 10th 2007 (Monday) onwards... It is an exciting move for me coz I have always loved the web world and working on the team which help shapes the future of the web is super exciting to me... Hopefully in time to come I will be able to write a lot more and provide some useful info to you all...

Q. So what will I be doing in Visual Studio Web Developer team...?
A. I will be the Program Manager for Visual Studio Project System for Web... Ofcouse that is very vague right!! So let me give some more details... Visual Studio Project System for Web comprises of creation, compilation and deployment of Web based XXX from Visual Studio...
The reason I said XXX is coz XXX can include Web Site, Web Applications and any other web properties that you may want to create from Visual Studio...

Q. So what can you expect from me?
A. Well, as usual feel free to contact me whenever and however way you want... If you have any thoughts, issues, suggestions, concerns or feedback about Web Development with Visual Studio then do not think twice before writing... I promise I will conciously spend time and energy in taking the feedback in the most positive way in the most positive direction...

Q. So what kind of things can you reach out to me for?
A. Practically anything to do with Visual Studio Web Development... If it falls under the area that I am responsible for I will work on it myself, if it is beyond my area then I will send it across to the right people...

Some Random thoughts:
I feel, lot of time we take Visual Studio for granted... Many times we think that whatever is available within Visual Studio or via available add-ins is what you can do with the technology !! But Visual Studio is a product for us developers and you can say out loud the things that you love or hate about it... At Microsoft we will love to take your thoughts and suggestions and try to turn them into reality... It does not mean everything that everyone hopes will become Visual Studio feature, honestly not everything that I will hope will also become Visual Studio feature but the laundry list will be something which can become the base for discussion for the Visual Studio team... Your thoughts and suggestions will be something that will be debated and then probably the top requests will be taken up...

I am intending to talk to as many developers as possible and try to find out what features would they expect in the next version of Visual Studio that would make their life easier, their experience enjoyable and their productivity higher and higher... I will be more than willing to have a phone calls set up with you to talk about your expectations and feedbacks so if you are interested in doing so do not hesitate to let me know... If you think you would like to join the discussion along with your team then that is great too...

In anycase, to know more about the area that my team is responsible for visit our team blog below... It will provide you a lot of context on the things that we can talk about more...

http://blogs.msdn.com/webdevtools/

I will internalize our team motto and end by saying "Your websites will be my passion!!"

Looking forward to writing more often in the future...